Curious how to start a blog that actually makes real money? Want to learn how to do it the smart way without making costly mistakes? Looking for real blogging guidance minus the hype?
If you answered yes to any of the above, then you’re in the right place. I wrote this free, easy-to-follow, step-by-step guide about how to start a blog and make money—specifically for beginners.
All you need to do is follow my five easy steps and you can be up and running with your very own blog in 15 minutes or less.
To ensure you start on the right foot, I tried to make this guide as simple and concise as possible. In each section below, I take you by the hand and show you the steps that you can take to launch your own money-making blog today.
So, how do you start a blog?
How to Start a Blog (and Make Money) in 2022: Ultimate Guide to Start Blogging Today
Learn how to start a money-making blog in no time using these simple-to-apply steps:
- Choose a name for your new blog
- Go live with your blog (using quality web hosting)
- Design a professional blog with a free WordPress theme
- Write & publish your first blog post
- Promote your blog and make money from it
- Create a smart long-term content strategy
- Commit to a consistent blog publishing schedule
- Use free photos and designs to make your blog content unique
Disclosure: Please note that some of the links below are affiliate links and at no additional cost to you, I’ll earn a commission. Know that I only recommend products and services I’ve personally used and stand behind. When you use one of my affiliate links, the company compensates me, which helps me run this blog and keep my in-depth content free of charge for readers (like you).
Do you need to be a techie to start a blog? Of course not! I started my blog with zero technical experience, and so can you. In fact, if you take quick action, your brand new blog can go live in as little as 10 minutes from now. Yes, it’s that simple.
I started this blog on my own, and obviously had to go through a steep learning curve. But, learning how to start a blog has been a highly rewarding experience for me.
Today, I run a six-figure freelance writing business while doing a full-time job, all thanks to my decision to learn how to start a blog. And I’m happy to share my learnings with you. I created this step-by-step guide to make sure you don’t have to go through the hoops like I did.
This free guide is aimed at beginning bloggers, where I teach the ins and outs of how to start a profitable blog from scratch. But before that, let’s answer two of the most common questions aspiring bloggers have.
What is a blog, anyway?
A blog is a website that is regularly updated with new and useful content. Some people start a blog as a hobby, while many others do it to earn money from their writing skills. In this guide, I’ll not only teach you how to start a proper blog, but also show how you can generate a real income from your blogging efforts.
Is blogging right for you?
If you’ve ever dreamed of owning an online business that earns you a regular income, then starting a blog should be on top of your list. When done right, starting your own blog can easily help you build a solid business and let grow your bank balance—regardless of where you live.
The best part about blogging is it doesn’t require you to have a degree in English literature or any special credentials to get started. It’s pretty simple and straightforward.
You can launch a successful blog even if you’re new to writing. Because people usually like reading blog content that’s written in a conversational tone and is jargon-free.
You’re truly never too young (or old) to start a blog. And it doesn’t matter how experienced or inexperienced you are. As long as you can write like you talk, you can make blogging work for you.
If you have any of the following goals for yourself, then you should take the plunge and start a blog:
- Generating an online income. If you’re tired of running in the rat race and want to make money working from home, you’re not alone. Each year, more and more people are bidding adieu to the cubicle life and are jumping on the make-money-from-home bandwagon. The good thing about the blogging business is, it doesn’t require a huge upfront investment to start. Also, it can prove to be a hugely profitable business in the long run due to its low running costs. What’s more, blogging is the perfect way for you to create a true passive income. Imagine spending a day writing an evergreen blog post and then making money from it for a long time to come! We’ll discuss the making money aspect of blogging later in this guide. But for now, you can be rest assured that building a profitable blog is not as complicated as you think.You can be a part-time blogger like me and still earn well into six figures every year.
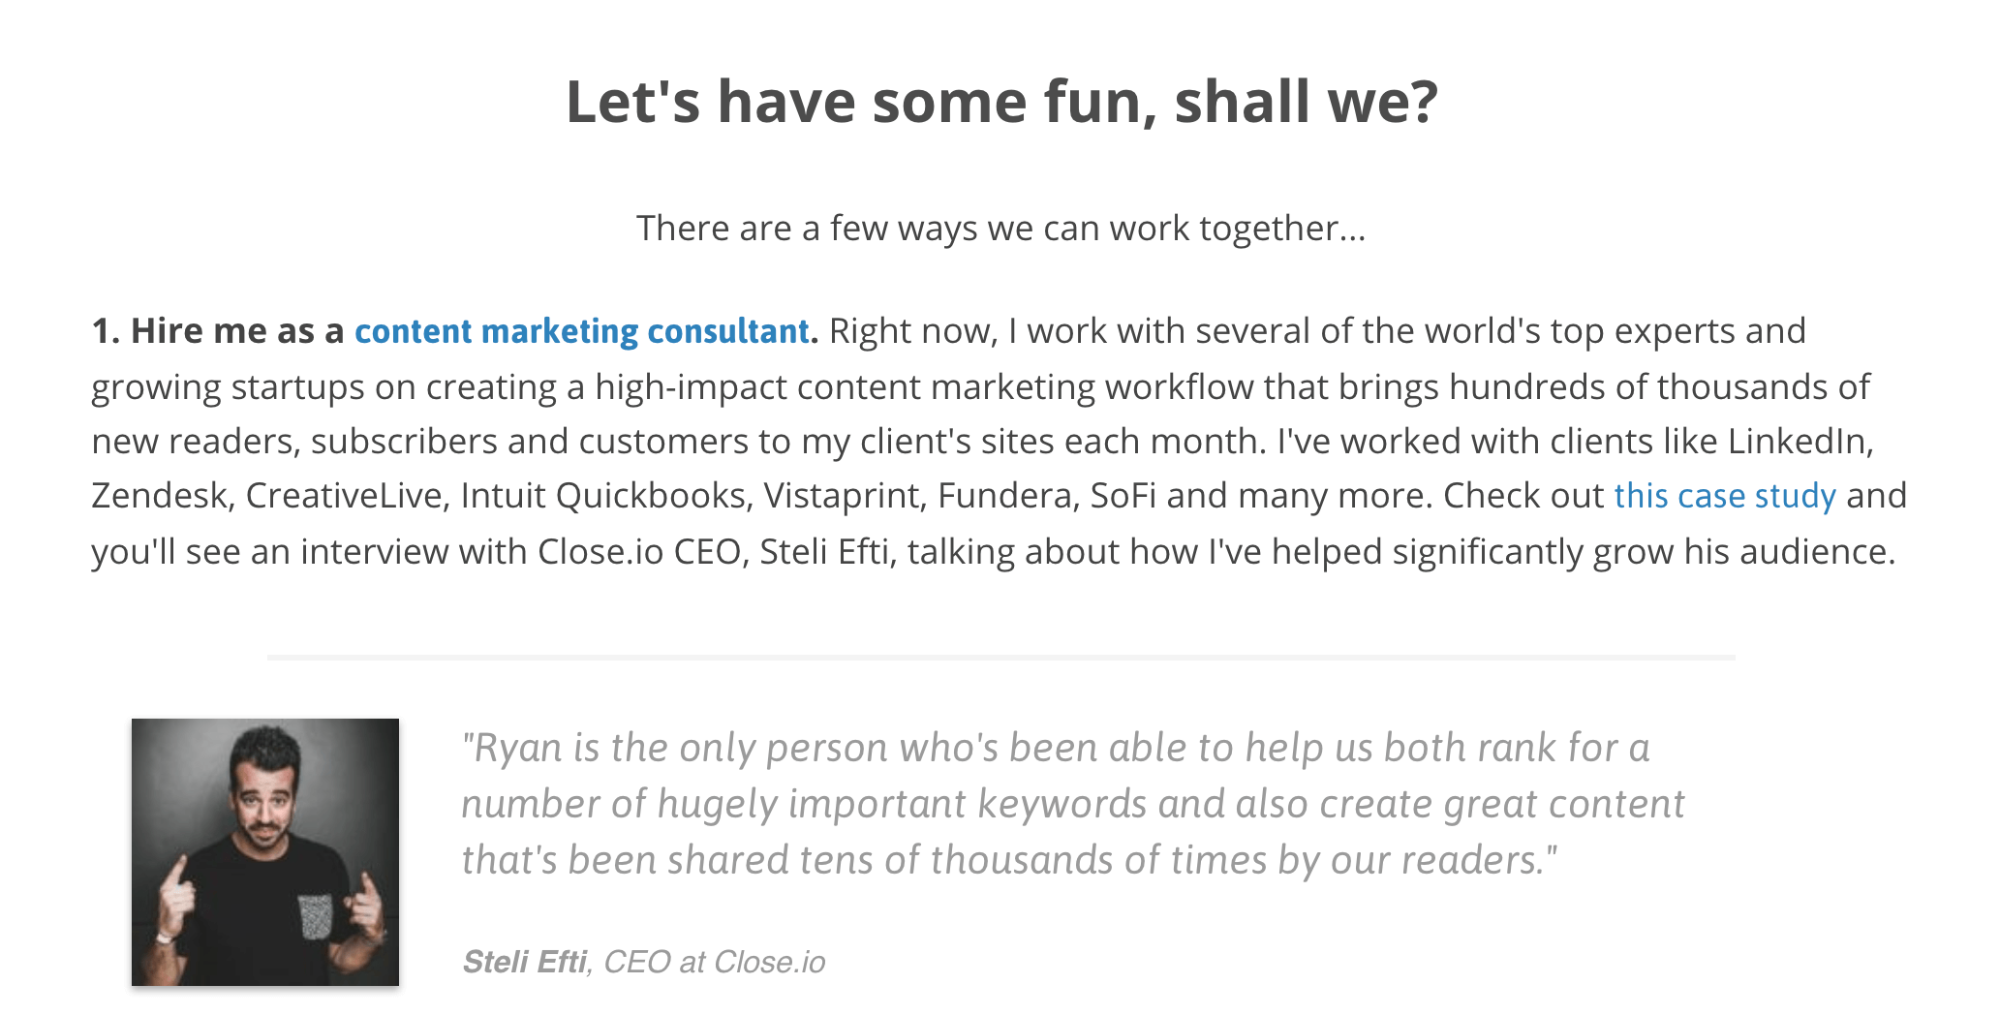
- Expanding your existing business. Starting a blog can help you overcome one of the most common challenges businesses face online: attracting more customers. How? Because it can help you spread the word without having to invest in expensive ads. I’ve helped many clients a.k.a small business owners create engaging blog content that attracts new, targeted readers—day in and day out. Since every relevant blog reader is a potential customer, it makes blogging totally worth your time.
- Growing your personal brand. Blogging can also give you an edge over the competition by elevating your personal brand. If your goal is to one day sign a 7-figure book deal (or simply get paid for speaking/consulting to a niche audience), you can easily leverage your blog to build real authority. And become a known expert in your field. Thanks to the rise of blogging, it’s never been easier to grow your personal brand and make a name for yourself.
- Sharing your own experience. Want to share your story with others? Have the burning urge to teach other professionals on improving their career? Starting a blog can help you do just that by letting your readers benefit from your experience.
You may have already spent a number of years developing a useful skill/craft or gathering deep experience at a particular job. What better way to give back then advise others who are just starting out? It’ll not only lower their learning curve, but will also help them avoid any common mistakes.
Blogging is no longer limited to journaling like the earlier days. Today, you can learn how to start a blog and use it to share everything—right from your journey through business and life to useful, actionable career advice. All you need is a will to share, help and give.
So, if you think you have what it takes and are prepared to learn how to start a money-making blog, let’s dive into the details with my simple, step-by-step, beginner-oriented tutorial.
Disclosure: Please note that some of the links below are affiliate links and at no additional cost to you, I may earn a commission. When you purchase hosting using my Bluehost affiliate link, they compensate me, which helps make this ultimate guide free of charge to you. Know that I only recommend products and services I’ve personally used and stand behind.
Now, let’s go ahead and discuss the first step of how to start a blog (for beginners).
1. Choose a name for your new blog
Your blog’s name matters more than you think. So the first thing you need to do is select a nice name for your new blog. But before that, I’m going to help you choose the right blogging platform and web hosting service, which are necessary to take your blog online.
The blogging platform & web hosting combination that I personally use (and one that the majority of the other bloggers highly recommend) is a WordPress blog, hosted by Bluehost.
WordPress is a publishing platform that lets anyone easily publish on the web. It has been helping bloggers around the world since 2003, and continues to dominate the blogosphere with more than 60% of the market share.
Bluehost on the other hand is counted amongst the most reputable companies in the blog hosting industry. This is the precise combination you’ll be using to launch your money-making blog.
Disclosure: Please note that when you purchase hosting using my Bluehost affiliate link, they compensate me, which helps me make this free guide to learning how to start a blog, well free of charge to you. Know that I also use Bluehost hosting, and I would never recommend a product, tool or service I don’t personally use & advocate for 🙂
Now, let’s begin the process of choosing a proper name for your blog.
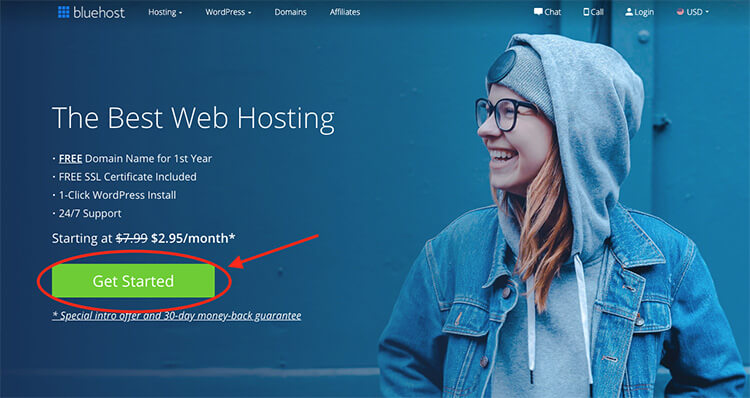
→ Click here to head over to Bluehost and hit the green “Get Started Now” button.
Choose your a hosting plan.
In order to get started, you’ll first need to select a hosting plan for your blog. If you haven’t heard of web hosting before, it’s basically an online service that gives your blog its own place on the Internet. In other words, it’s what keeps your blog alive and kicking.
I personally use and recommend the Choice Plus plan. Mainly because you get the awesome “Domain Privacy” feature with it, which hides your domain record (or your personal information) from spammers, hackers & thieves. Trust me, you’ll have a lot of peace of mind by allowing Bluehost to guard your private data on your behalf.
Choosing a hosting plan will look like this. Just hit the green “Select” button to opt for a hosting plan of your choice:
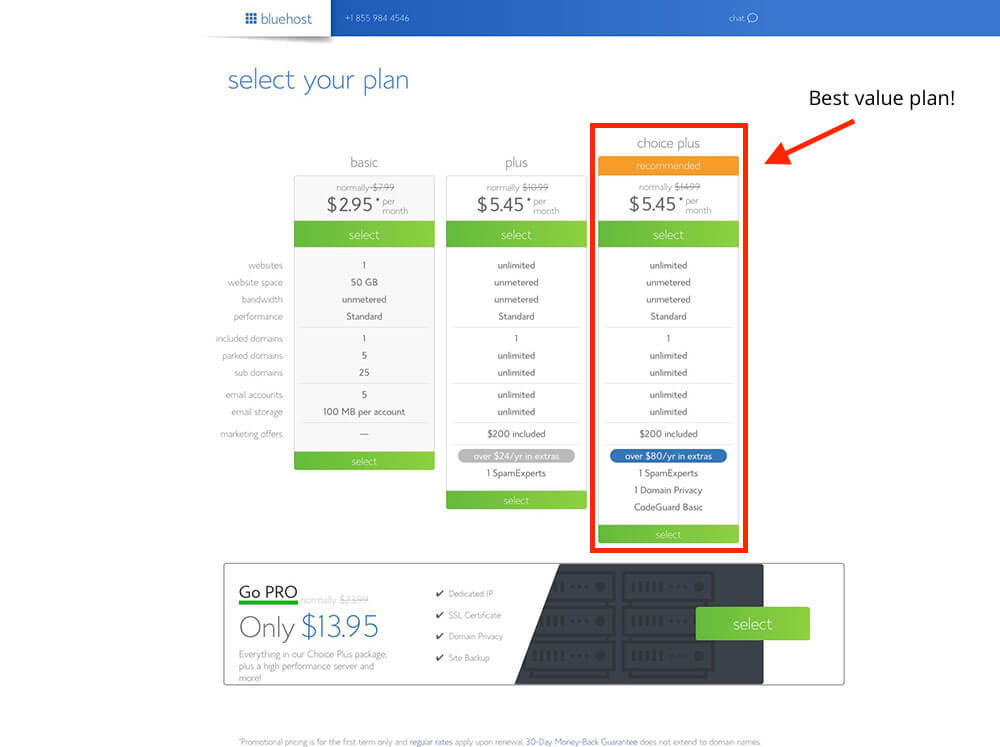
As discussed above, I recommend that you select the Choice Plus plan. Mainly because it comes with the important Domain Privacy feature that helps you keep your private information (such as your email address, phone number, etc.) safe from prying eyes. But of course, you’re free to choose any other plan of your liking. As for the Domain Privacy feature, you can add it to your final order before checking out.
Choose a domain name for your blog.
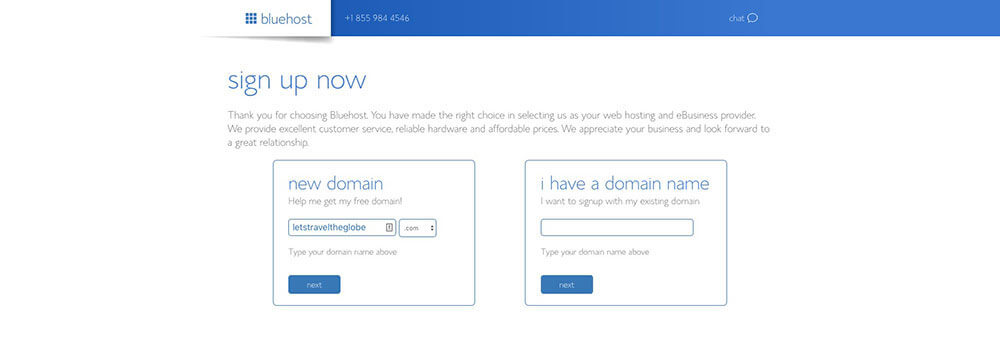
If you already have a domain name in mind, this is the step where you find out if it’s available to register. Just type in the domain name of your choice and hit the next button.
In case your chosen domain name is taken (very possible), you may want to try another variation of it. But don’t beat yourself up if you’re unable to come up with a good domain name idea right away. Bluehost gives you the option to choose your domain name later once you’re done setting up your account.
This gives you ample room to think of a better, more deserving name for your domain name. And if you need more help or clarity, we’ll be covering the topic of choosing the right name for your blog later in our free guide.
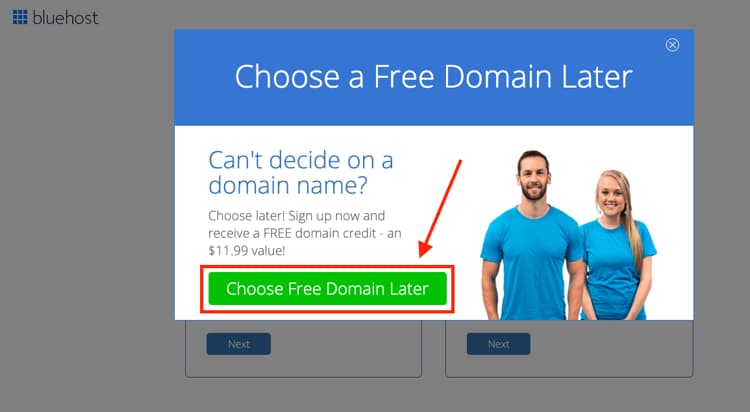
This is where you get to select the option to choose your domain later (it’s a popup that appears if you hover on this page or scroll your mouse up towards the top):
Once you’re done with the domain name part, the next and the final step in the sign up process is actually creating your Bluehost account.
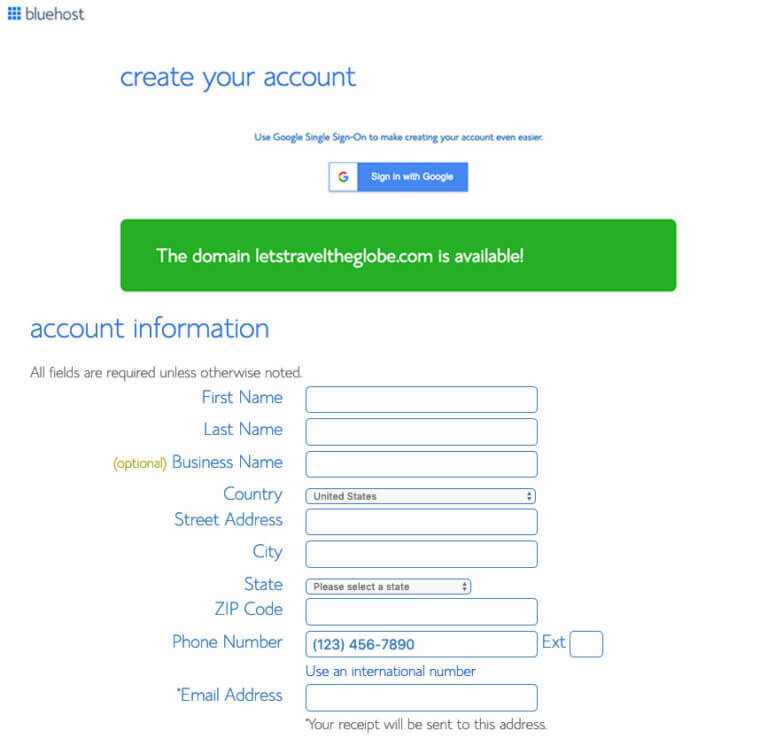
Create a Bluehost hosting account.
Creating a Bluehost account is a simple process. You begin by entering all your basic details such as your full name, email address, and your mailing address. It’s important that all of your contact details are up-to-date.
Alternatively, if you have your information stored in your Google account, you can connect it directly to your Bluehost account and import your details in a click. No need to enter it manually.
Choose a proper web hosting package.
Some people like to pay their hosting fees years in advance, while others prefer paying annually. Either way, Bluehost lets you choose your account plan depending on the amount you’re willing to pay upfront.
Unlike other web hosting companies, Bluehost does not offer a monthly payment plan. You only have the option to pay your hosting fees annually or up to 5 years in advance. This actually makes sense because web hosting is almost always a long term commitment. Besides that, monthly payment plans prove to be costly. Now, regardless of the payment option you choose, the pricing here works in your favor.
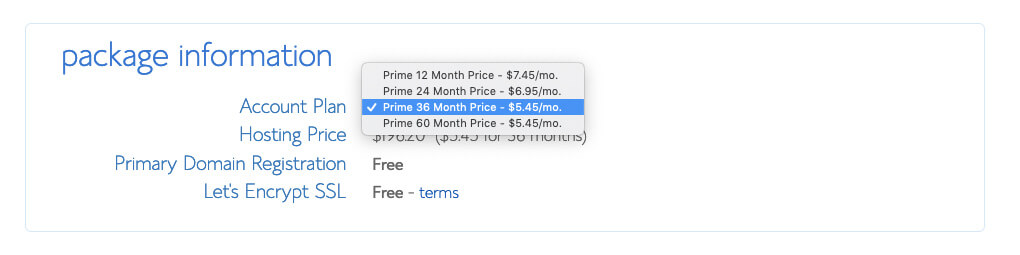
What pricing plan should you choose?
Investing in a quality web hosting service is a long-term investment. And that’s how you should be thinking when choosing a pricing plan. I not only use but also recommend the “Prime 36 Month Price” because it lets you get the best deal. You’re able to lock the lowest possible hosting price without worrying about renewing for the next 3 years.
This low price is a special bargain for you, because it’s only available to new customers on their first payment. Also, even if the pricing goes up next year, it won’t affect you.
Your low price is truly locked for a solid 3 years if you choose to go for the 36-month plan. I want you to save in the long run, which is why I recommend you choose the longest duration plan.
Selecting the only necessary package extra.
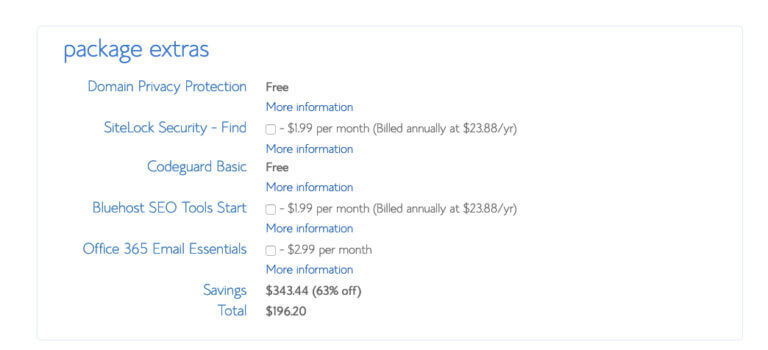
When it comes to package extras, it always makes sense to stick to the important ones. In our case, it’s the Domain Privacy Protection extra. You can safely skip the others because you’re after all using WordPress, which already gives you access to a ton of free/cheap plugins that you can easily install on your own.
As we move forward in this guide on how to start a blog, I’ll tell you what plugins and tools you can use on your blog to help with things like search engine optimization.
Now, we’ve already talked about the importance of having the Domain Privacy extra. It helps keep your private information private. So if you already chose the Choice Plus Plan on the previous screen, you should have the Domain Privacy Protection included in the plan for “Free” as seen in the above screenshot.
However, if you selected one of the other two plans (Basic or Plus), then you’ll have to manually add the Domain Privacy Protection to your order. Fret not, it only costs about $1/mo.
The total amount you see on the screen is what you’re going to pay upfront. Depending on how far advance you’ve paid, you won’t have to pay again for a long time. And if for some reason you don’t want to continue your blog, Bluehost offers a strong 30-day-money back guarantee. So you’ve really got nothing to lose, and only to gain.
Enter your billing information.
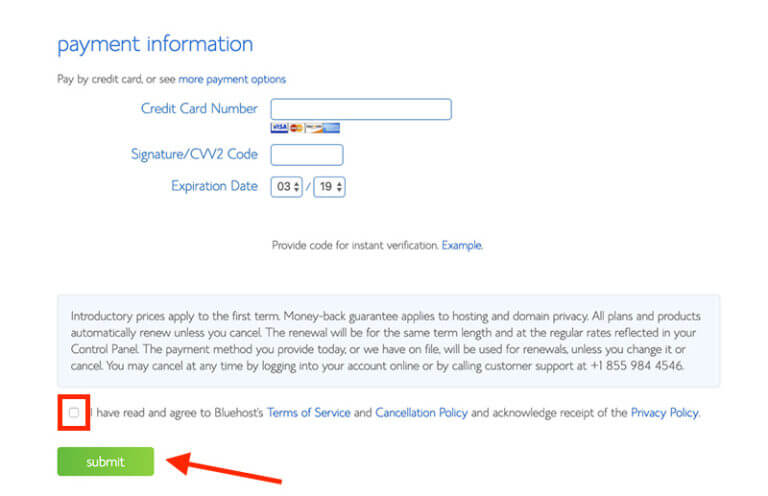
Last but not the least, it’s time to take care of the billing part. Just fill in the correct billing information, agree to Bluehost’s Terms of Service by checking the box and click that green “Submit” button!
That’s it! You’re finally on your way to launching your new money-making blog! Go on, do your little victory dance!
Now that you have the first and major step out of your way, you need to get to the next important stage—completing your blog setup and optimizing it for the big win!
→ Click here to jump over to Bluehost and register your domain name if you haven’t already done it.
As you move to the next page, you’ll be taken through a detailed, step-by-step process of installing WordPress on your blog through your new Bluehost account. Later on in this guide, I’ll show you the proper way to optimize your blog and also explain how to make your blog look better with free/cheap WordPress plugins, which you can install in a breeze.
How to choose the ‘right’ name for your new blog
If there’s one question that I keep getting from my readers then it has to be about choosing a good name for their blog. Which is why this is one topic I couldn’t skip even if I wanted to.
Most people starting their first blog don’t have much clarity on naming their blog. So if you’re feeling the same, you’re not the only one. But don’t rush. Instead, take your time and think well. Because a hosting company like Bluehost lets you comfortably choose a domain name at a later date.
As I mentioned above, it’s okay if you find your dream domain name taken. Just move on by selecting their “choose it later” option. And get back to it once everything is set up. The last thing you want is to get hung up and stop taking action.
However, since many of my readers want an answer to the “what should I name my blog” question, I’d like to delve deeper into the topic…
The name that you choose for your blog is no doubt an important part of your overall blog setup. But the good thing is, it’s not something that is etched in stone. You can always go back and change it if you feel the need in the future. If Google can change the name of its parent company to Alphabet, why not you? Don’t let the ‘naming’ step hold you back from moving forward.
Go ahead and get creative; think of something that’s close to the topic your blog is going to be about. And if that doesn’t work, simply go for yourname.com or yournickname.com. That’s what I did with my blog: ryrob.com. Don’t make it complicated. Keep moving because execution matters.
Remember, your blog name can be anything, but it has to be decent and descriptive enough. Why? Because it’s the first thing that your potential readers will see when your blog posts show up in the search results. Your name will give them an impression about who you are, the topic you’re blogging about, and maybe even about your personality!
Like I said above, there are many ways to find the right name for your blog. You’re only limited by your imagination. But to make the process even easier for you, I’ve designed a few simple and fun exercises. These will help you choose a nice name while you’re going through the process of learning how to start a real, money-making blog.
First, focus on your niche, dig deeper and uncover your main purpose behind starting a blog.

Picking the right niche for your blog is the first step to making it successful. But right after you choose a niche to write about, you need to go out there and find out who else is active in your industry. Get familiar with the popular bloggers who are making a difference in your niche.
For example, if you’re starting a blog about traveling around the world, you could consider naming your blog lLoveWorldTravel.com.
The reason you want to check out other people’s blogs in your niche is because it’ll inspire you to find a name of your own. Take a note of their names and understand how they’re branding themselves.
Make sure you spread around your focus and look at all types of blogs within your niche, not just the big, successful ones. Regardless of your niche, I’m confident you’ll find plenty of them and learn a ton in the process.
If you want, you may even wander outside your niche and search for words that your most-liked brands use. What are the common words they use that you feel connected with? I like to call this exercise searching for “good words”.
Next, find out why you want to start a blog.
Why are you learning how to start a blog? What’s your core motivation? The name you choose for your blog should connect to your main purpose. Find out what represents the actual message you’re trying to convey.
As Nate Weiner, founder of Pocket said:
“The first question to ask yourself is why do you want to rebrand? What does your company and product mean? Where do you want to take it into the future? Does your existing or new name let you do that?”
This question may feel a little intimidating, but don’t allow it to halt your progress. A purposeful name has real meaning behind it. However, that doesn’t mean you can’t go for other fun and memorable names that are available to register.
Now, put yourself in your reader’s shoes.
You’ve already taken the steps to lay the foundation for your new blog. The groundwork is done, and now it’s time to get down to some serious business. Get into your reader’s shoes and start thinking like them.
Focus on your blog’s topic area and try to pinpoint your ideal reader. Ask yourself, what kind of content would they like to read? What will make them sit up and take notice? What’s going to make them choose your blog over others?
Start by making a list of all the topics and sub-topics you want your blog to be known for. Delve deeper and keep going without really judging these ideas at this stage.
If you do it right, you should already have a huge list. Use it to look for combinations/connections that you know will work. The idea is to come up with something that’s not only simple but also memorable.
Some awesome examples of blog names are:
- Smart Passive Income
- Convince & Convert
- Art of Manliness
- Learn to Code with Me
- The Huffington Post
Finally, share it with other people
You may feel or think you’ve come up with the best name in the world for your blog. But keep in mind that it still has to pass the “people test”. If it’s not easy for others to recollect or share it within their network, then you’ll have a hard time generating the much needed word-of-mouth for your blog.
So just for the sake of practice, it’s a good idea to say your name out loud and tell it to your family/friends. Ask them for their feedback. What do they really think about it? Is it easy to pronounce? What emotions does the name conjure up for them?
Of course, your ideal readers are different than your close relatives/friends. But getting an outsider’s perspective from your loved ones will give you a little more clarity.
And if you’re having a hard time finding a novel name for your blog, you may want to try out a domain name generator. They can help you come up with better creative ideas for your blog’s name.
Ready for your domain name registration and blog hosting setup?
Check out this detailed video tutorial I created where I take you step-by-step through the whole process of starting your blog and getting it all set up:
Disclosure: Please note that when you purchase hosting using my Bluehost affiliate link, they compensate me, which helps me make this ultimate guide to starting a blog free of charge to you. Know that I also use Bluehost hosting, and I would never recommend a product, tool or service I don’t personally use & advocate for 🙂
When it comes to starting a successful blog, I know from experience how big of an undertaking it is. I’ve been there, and done it.
As you know, the first important step to taking your blog live is registering your own domain name and setting up your web hosting account (get your domain and hosting from Bluehost if you haven’t yet).
Okay, let’s pause right here, get your domain and hosting on Bluehost, then come back and let’s get back to drawing board!
2. Go live with your blog (web hosting)

The last and the final step in your blog’s technical setup process is to actually go live with your blog or take it online. That’s exactly what a hosting company like Bluehost helps you with.
Did you go through the step #1 exactly as I instructed? Great! You should now have web hosting in place for your new blog. Feel free to go directly to step #3 of the process and continue to progress through this tutorial.
However, if you’ve decided to choose another web hosting service and not Bluehost for your blog’s domain name, you’ll have to get that done before moving ahead.
Being new to the whole blogging game, it’s natural for you to get overwhelmed. In order to ease things for you, I’m happy to help you understand the basics first.
What is web hosting, exactly?
We did briefly go through this in step #1 above, but to give you a clearer idea, I’d like to give a more detailed answer.
When you create a website, you obviously want your target audience to access it. And to make it accessible to them, you require a “web host”. Your host helps people connect with your blog when they try to access it by clicking on a link or typing in your URL. All your website data is kept safe by your web host.
The reason I use and recommend Bluehost to bloggers is because it’s highly reliable. Plus, when you opt for their service, you get everything under one roof—right from domain name registration to web hosting. And if you’ve been with me throughout this tutorial, you should have already have Bluehost set up as your hosting provider.
If you followed my first step above to the T and are done signing up for Bluehost, then feel free to skip this step. You already have your domain name registered and hosting set up.
Web hosting in simple terms is a place or rather a home for your blog. When someone drops in (clicks a link or types in your URL), they get to see everything you have on display on the inside. Unlike other free blogging platforms, web hosting comes at a monthly/yearly cost, which is totally worth it in the long run. Without a good web host, it would be impossible to make a blog successful.
There’s not one, but many web hosting companies to choose from for your blog. But not every web hosting service is the same. Which is why your chosen host should have the following qualities:
- Speed
- Features
- Security
- Support
- Track Record
These are critical aspects to consider when choosing a web hosting service. One company that fortunately has all the above qualities is, you guessed it, Bluehost. I keep mentioning them in this guide again and again because I’ve found them to be the best at what they do. They make my blogging life easier, which is why they’re the web hosting company of my choice.
What I love about Bluehost is their easy 1-click WordPress install feature. As a blogger, you’ll love it because it makes starting a self-hosted WordPress blog a no-brainer. Not only that, it comes with a free domain name (if it’s available) along with a dedicated, 24/7 support to help you out with any queries or troubleshooting you may need when you’re getting started.
If you’re focused on creating a money-making blog that will eventually replace your 9-5 job, then you need to make sure your blog is safe and accessible. With Bluehost by your side, you get the security and top features along with the much-needed peace of mind knowing your blog is in the right hands.
But if you want to explore more options, then there are other web hosting providers that you may want to opt for:
The 2 best alternative blog hosting companies worth looking into
- Dreamhost — Have I hosted any of websites on Dreamhost before? The answer is yes. In fact, I still do have some sites on it. Just like Bluehost, they offer 1-click WordPress install, free SSL certificate, etc. But what sets them apart from other hosting companies is that they are the real deal when it comes to offering a pay-per-month plan. You pay for hosting your blog on a monthly basis, with zero hidden costs. Here are some other web hosting services that offer similar monthly payment plans
- HostGator — What makes HostGator different and worth considering is their robust domain marketplace. You’re free to register a new domain name with them or go through thousands of already-registered domain names that are up for sale. Some of these domains come from established players, which means they may have existing domain authority that you can leverage for better search engine rankings.
Interested in evaluating more of the top blog hosting providers? Then check out my breakdown of the best web hosting plans this year (suited for bloggers). Those options will set you down the right path to choosing the right host as you learn how to start a blog this year.
Moving forward, we’ll now talk about the next steps with the assumption that you’re done registering a domain name and have already decided on the web hosting plan for your blog. If you haven’t done so already, then put in a few minutes to quickly set up your hosting account on Bluehost. It’s worth it.
3. Design a professional blog with a free WordPress theme

Now that we’re done with the initial phase, let’s move on to the more exciting part of learning how to start a blog.
Getting the right design for your WordPress blog may seem a little overwhelming at first, especially if you’re new to it. But it’s not really technically challenging or difficult. If you’ve come this far, then you can easily take care of this step too.
If you want to start a true money-making blog, WordPress is your only smart and reliable option.
Now, before we move forward, let me explain some ‘beginner’ terminology to you so that you have a better understanding of WordPress. And also explain why it’s the perfect platform to start and run your blog on.
What do we mean by a CMS?
A Content Management System (or CMS) lets you do just that: manage your blog content. Right from writing to publishing your posts — it helps you do everything.
WordPress is without doubt one of the most versatile CMS’s out there because it lets you do more (like uploading images/videos, changing your blog’s design, etc) and is also easy to use. That’s exactly why I and many other popular websites like Forbes and TechCrunch use it.
Should I start a WordPress blog? And is WordPress truly free?
You obviously have other versatile CMS options out there like Squarespace, Ghost, and Wix. But a self-hosted WordPress site should be your go-to choice because it’s the best long-term solution if you eventually plan to make money from your blog.
Since the time I learned how to start a blog, I’ve used WordPress for blogging (and Bluehost for hosting). It gives me immense control and flexibility. However, it’s important that you understand the main differences between WordPress.com and WordPress.org:
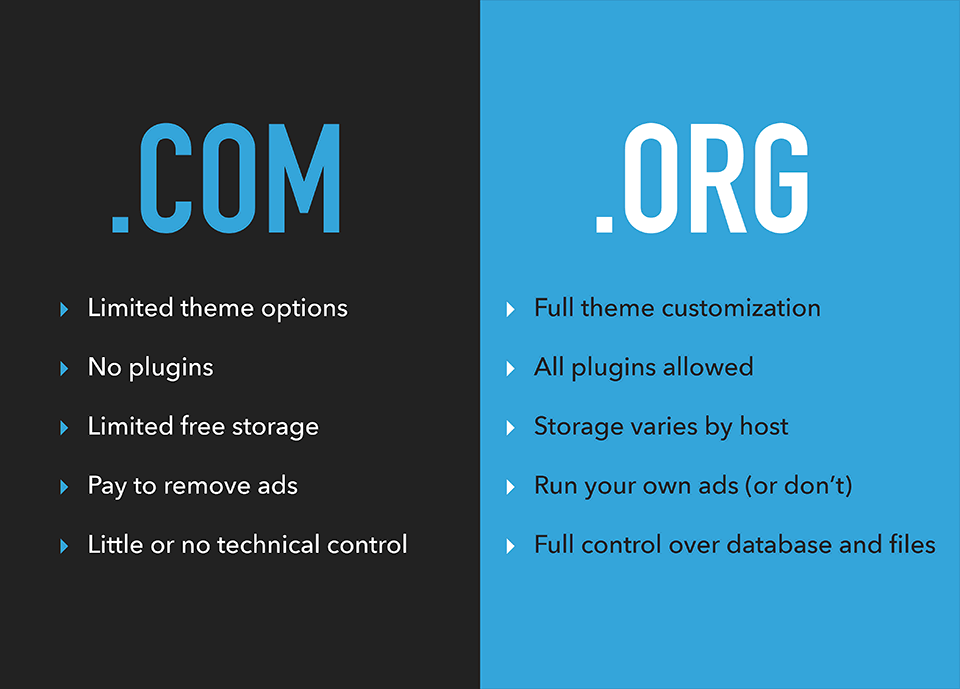
WordPress.com
- Very restricted, but also free to use
- No custom domain name (i.e. you have to go for your-site.wordpress.com)
- Extremely limited monetization options (can’t sell own ads)
- Doesn’t support plugins that can help you enhance your blog
- Limited theme support and only basic designs
- Requires payment to remove WordPress branding and get own domain name like yoursite.com
- Limited SEO/Analytics
WordPress.org:
- Customizable design, plugin support, and zero branding
- Full control over monetization
- Strong SEO features
- Allows you to start your own eCommerce store or membership site
- Free except the small monthly web hosting fee
The choice is totally yours. But if you want to take your blog to the next level and earn real moolah from it, WordPress.org is hands down the best option. It’s the CMS that helps you grow and become a professional blogger.
Plus, with affordable hosting plans from my trusted web hosting company Bluehost, you can launch your blog in no time using their one-click WordPress installation after signing up.
Here are step-by-step instructions on installing and configuring WordPress on your new blog. We also cover publishing your first post:
In this video we go through some of the basics of getting your WordPress blog set up. Go ahead and get familiar with your blog’s backend. Explore things to get a better understanding of how WordPress actually works. It’s fun!
The importance of design when starting a blog
Contrary to popular belief, design does matter to readers. In a 2012 study from Google and the University of Basel, researchers discovered that users do judge a website by its looks and functionality, and they do it in as little as 1/20th of a second. Which means, you barely have a few seconds to win or lose your reader’s trust and form an impression.
Great design helps you create a trusting relationship with your blog readers. Because it proves that you want to give them a great experience with a simple, clear and intuitive design. And shows that you actually care about how they spend their valuable time on your site.
Selecting the best (free) WordPress theme for your first blog
If you’re a new blogger, it’s okay to not spend money on a paid WordPress theme, such as the one I’m using (OptimizePress). Don’t get me wrong, while OptimizePress is an amazing theme, it’ll only distract you from your main goal: generating real traffic. Initially, you need to focus on things that matter.
The best part about WordPress is that it allows you to choose from many, many wonderful, free themes that are available to everyone. But it’s easy to get lost. So make sure you don’t invest too much time into selecting a theme for now. Just head over to Appearance > Themes > Add New Theme > Popular and go for one the one that feels appropriate to you:
I recommend you start with the free Elementor Page Builder. It’s easy to use because their free version comes with detailed installation/optimization instructions.
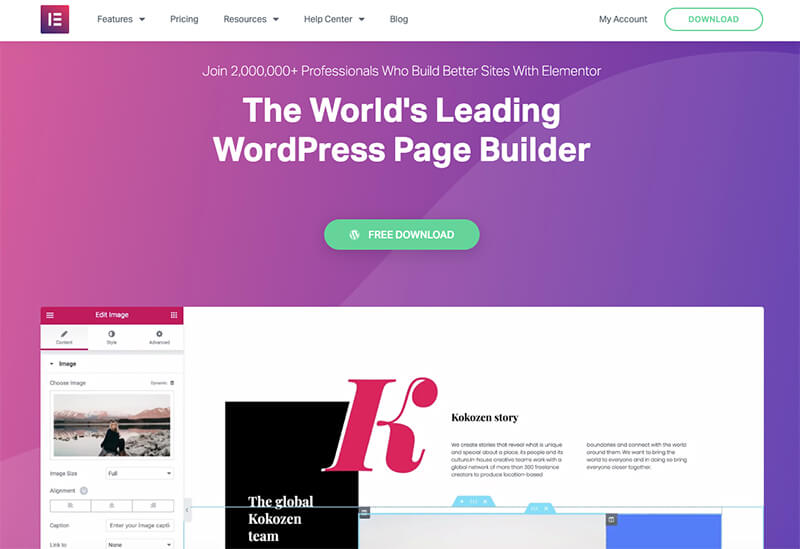
Elementor is my top pick because it’s clean, simple and gives your blog a premium feel for free. Plus, you can always upgrade to get access to more widgets, templates and design resources. In my humble opinion, it definitely falls under the “best WordPress themes” category.
Evaluating other WordPress themes for your blog
Choosing a theme for your WordPress blog can be fun, but also time-consuming.
With so many theme options available, it’s easy to get confused and choose a good-looking theme with poor functionality. You have to remember that blog design is not just about looks. It’s also about helping readers navigate and read your content better.
Given below are a few useful suggestions to help you evaluate WordPress themes and choose one for your blog:
- Focus on simplicity: You’re starting a blog to share easy-to-consume content with your audience, not to win design awards. So say no to fancy themes that hinder reader experience, and yes to ones that allow usability/simplicity.
- Make sure its mobile responsive: With over a billion active smartphone users around the world, it’s important that your WordPress theme looks good on both: desktop and mobile. Choosing a responsive theme allows you to give people a great mobile reading experience while helping your blog rank better—because Google has been heavily favoring mobile-friendly sites.
- Test cross-browser compatibility: Most developers ensure their themes are compatible with all the major browsers. But just to be on the safe side, do your own little test across various browsers such as Firefox, Chrome and Internet Explorer before selecting a particular theme.
- Supported plugins: WordPress plugins are nothing but “Add-ons” that make your blog more functional and easier to promote. Make sure to choose a theme that supports all the popular plugins.
- SEO friendliness: When you’re running a blog, you want people to find it via the search engines. SEO or search engine optimization lets you improve your chances of ranking in Google, Bing, etc. Check with the developer to see if your selected theme is ready for SEO.
- Support: If you get stuck with a problem, you’d need technical help. Some free theme developers offer support to their users, while many don’t. Keep that in mind when opting for a theme.
- Ratings & reviews: Try to find themes that have good ratings/reviews, which are usually found on the download page of your chosen theme. However, I highly recommend the Elementor WordPress theme if you’re new to blogging.
Once you’ve found the appropriate theme for your WordPress blog, you should start looking for the right WordPress plugins to help you customize and enhance your blog further.
10 important WordPress plugins to install on your blog right away
WordPress plugins are an important part of your blogging journey, which is why you can’t ignore them. They help you design a blog that’s worth it.
Good plugins make your blog more functional or enhance it by adding features like email capturing, image optimization, etc. Which is why you need to choose the right plugins (out of the many thousands available for download) and avoid installing too many as it may affect your blog’s speed.
Although the types of plugins you select largely depends on the type of blog you’re building, some are more essential than others to increase your chances of success. Given below are 10 super-efficient plugins to consider installing when starting a blog:
1. Yoast SEO.
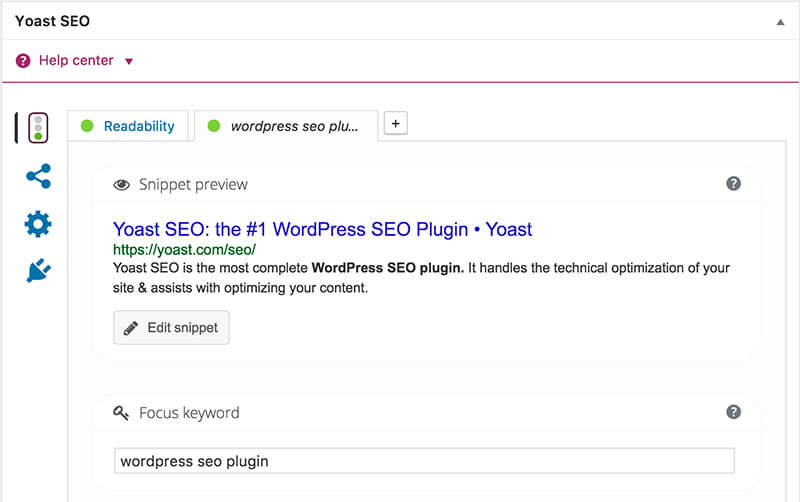
The success of your blog depends on how many people find your content. The Yoast WordPress plugin lets you optimize your blog post titles, descriptions, content length, etc, essentially making your blog more search engine friendly. And increasing the chance of people discovering your blog content.
2. OptinMonster. Building an email list? The OptinMonster plugin helps you convert more blog readers into loyal email subscribers with an array of tools. For example, their “exit-intent” popup makes it easy to convert people that are about to exit your site.
3. WPForms. When your readers or other bloggers want to get in touch with you, they should be able to fill out a simple contact form on your blog instead of firing up their email client. Using the WPForms plugins, you can easily add a robust contact form anywhere on your blog without getting your hands dirty.
4. Sumo. Right from increasing social shares to getting more email captures, these two WordPress plugins help you do many useful things that are essential to take your blog to the next level.
5. MonsterInsights. Super-simple to use, MonsterInsights is without a doubt the most effective Google Analytics plugin for WordPress. Period. By connecting it to your Google Analytics account, you can learn more about your visitors and how they interact with your blog. Giving you more insight into creating a better experience for your readers.
6. BackupBuddy. If and when things go wrong, you don’t want to lose your hard work. Use this plugin to backup your blog regularly and keep your blog content safe.
7. WP Rocket. Nobody likes a slow-loading blog, not even Google. The WP Rocket WordPress plugin speeds up your blog by caching your pages, reducing file sizes and in the process, boosting your chances of ranking higher.
8. MaxCDN. This is one plugin that goes hand in hand with WP Rocket because it makes your images load quicker.
9. MemberPress. Want to turn your blog into a membership site and start charging money for access? MemberPress is probably the easiest way to restrict your blog content and sell paid membership to your readers.
10. Insert Headers & Footers. Adding code snippets into your theme can be a pain. This plugin allows you to effortlessly edit your theme and add code snippets while avoiding any technical issues.
Basic WordPress blog settings you want to become familiar with now.
Regardless of why you’re starting a blog or what you want to achieve with it, you should have a basic understanding of how to get going with WordPress. Knowing these functions lets you customize your blog’s visual appearance.
Let’s look into a few WordPress settings that you’ll find in your dashboard that need your attention:
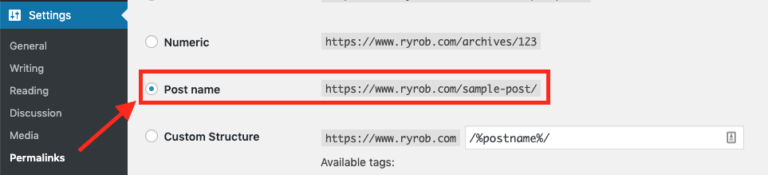
Permalinks.
You want your blog URLs to be Google-friendly. And that’s why your permalink settings should be in place right from the start.
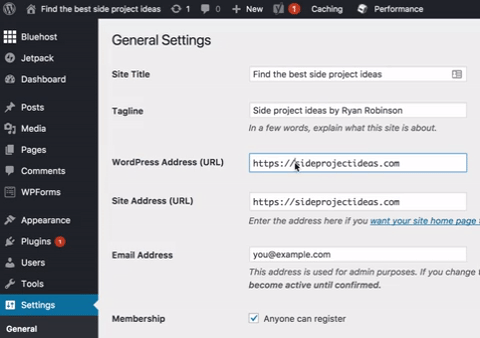
If you have set up your WordPress blog on Bluehost like I showed you, the permalinks settings should already be optimized in the right format: https://domain.com/post-name
But in case you need to optimize them, hover over “Settings” in your WordPress dashboard and navigate to Settings > Permalinks. It should look like this:
Cleaning up your default blog URL.
Once you have installed the (free) Elementor WordPress theme on your blog, clean up your default website URL so that it starts with “www”.
Your URL will look visually appealing and easy to read when it changes from https://yourblogname.com to https://www.yourblogname.com.
You can change it in a jiffy by heading over to Settings > General like this:
Now all your blog pages should automatically redirect to the www version, giving it a more professional and trustworthy feel.
Setting the homepage for your blog.
You can set your homepage to anything you want (such as your product sales page), but for now, just set it to list your most recent blog posts.
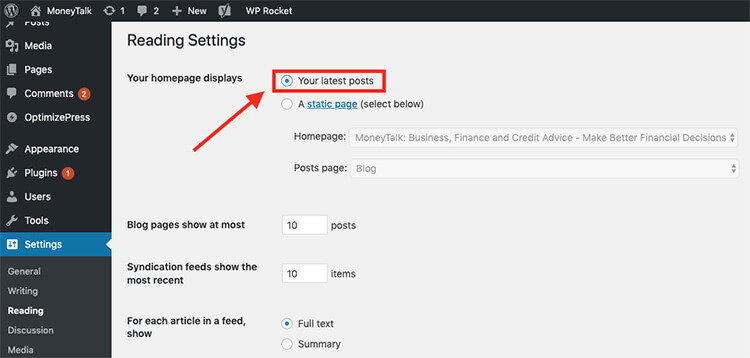
When you choose to make your homepage to display your blog, then update the settings so that visitors can see full text of your blog posts rather than short previews. Why? Because it makes your new blog look more active with lots of content. You can revert to the preview format once you have more than five or six posts.
Go ahead and change these settings by browsing to Settings > Reading.
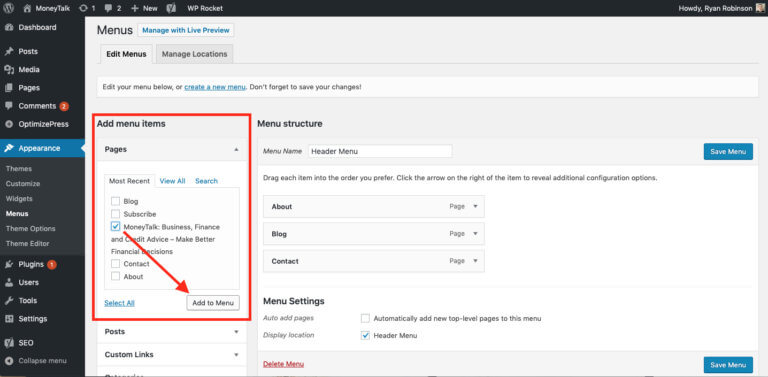
Setting up the menu for your blog.
Since you’re in the initial phase of learning how to start a blog blog and getting it setup, there’s no immediate need to create a menu with links to your key pages such as About, Contact, etc. But once you’re about to create a homepage/footer menu, you can go to Appearance > Menus and create them easily.
Now that we’re done setting up the basic foundation for your WordPress blog, it’s time to move forward and create a few important pages of your blog.
Creating the key pages of your blog (about, contact, hire).
Besides publishing relevant/valuable content, your blog should also give some basic, foundational information to your readers about your background, your purpose, and how they can contact you.
Although these pages are basic and almost all blogs have them, you can get creative and add your own twist to them.
Follow these instructions and create your own About page that goes beyond the traditional approach:

Writing an About page for your blog:
When people visit your “About page”, they expect to learn more about you—and I suspect that building your brand is one of the reasons you chose to learn how to start a blog in the first place. But as more of your readers start visiting it, you should go beyond. Your About page gives you an opportunity to tell readers your story, get them involved and turn them into an avid fan.
So what should you include on your About page? Here are a few questions that your About page needs to answer:
1. What kind of value are you going to give away?
Ironically, your “About Page” shouldn’t just talk about you. It should also give your readers the needed clarity on what they will get out of your blog in terms of value.
You should have a crystal clear idea on who your ideal audience is and what kind of value you’re creating for them. Armed with this knowledge, you can craft a value-oriented headline and an impressive intro for your About page.
2. Who is your blog for?
A lot of your first-time visitors will visit your About page to know if they’re in the right place. You can help them gain more confidence in your blog by:
-
Telling them exactly who your blog is aimed at: This is the most basic thing you can add to your page. So, for example, if your aim is to create a community sharing freelancing tips for work-at-home moms, just write: “Started in X as a freelancing resource for work-at-home moms.”
-
Showing them proof to solidify your position: If you can prove to your readers that you’re a real, active part of the community yourself, you’ll easily win their trust. Show them how you contribute to this community and what you bring to the table. For example, if you’ve guest blogged on other blogs within your niche, share it with them.
If you are already known in your community, then go for the second option as it can position you as a thought leader in front of your readers. But since you’re just starting out, the first option works fine.
Now, do keep in mind that you cannot impress everybody who visits your blog. In fact, trying to write for everyone is a failing formula. If someone reads your About page and doesn’t connect with it, it’s okay. It’ll only help you find your ideal readers.
3. Why should they follow your teachings or ideas?
By now, the above sections should already give your readers a fair idea about who you are. But you need to go beyond the “who” part and towards the “why”.
Why should they listen to you?
Your About page should address the “why” part by showing them what they can expect:
- The types of blog posts you create: “If you like X, Y, and Z, you’re in the right place.”
- The benefits they will get out of reading your content: “I share everything I’ve learned about stocks and personal finance.”
- The section they should start with: “If this is your first time here, check out my free 30-day email course.”
- The reason they should trust you and your blog: “I regularly contribute to health magazine articles and online blogs…”
- The history of your blog that they should know about: “”Back in 2007 is when I started writing about cars as a car salesman…”
Don’t hesitate to be who you are or display your true identity. Because people love real-world stories and really connect with them. Help them see things your way, and they’ll happily follow you.
4. Where do you want them to go next?
If you don’t get the last part of your About page right, then all your efforts to connect with your readers will go to waste. That’s when you tell your readers what you want them to do next.
The action you want them to take could be anything that will help them know you better. You could ask them to join your newsletter, follow you Twitter, etc. The point is, you shouldn’t lose them once they reach the end of the page.
To give you a better understanding, take a look at mine:
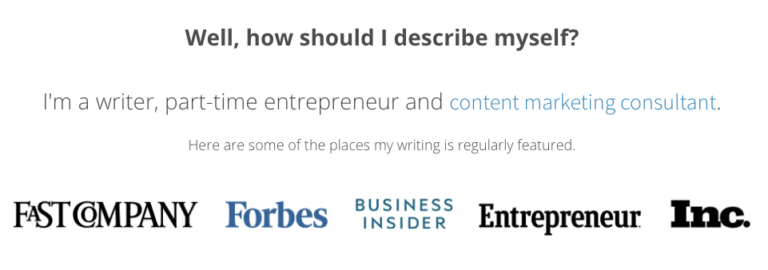
As you can see, I’m not asking my About page visitor to take an action that they may hesitate to take, such as subscribing to my email list. Because I want them to first learn more about me and my nature of work. Which is why my Call-to-Action (CTA) leads them to some of my best content.
Writing a Contact page for your blog
It’s surprising how many bloggers forgo adding a proper Contact page when they’re learning how to start a blog—only to never go back and do it right again. But if you want to grow your readership, you shouldn’t make that mistake. Give your readers a hassle-free way to get in touch with you.
If you look at my Contact page, it has even more information about me. But since you’re just starting out, your page could point readers to your personal email (or a contact form) along with a suggestion to connect with you on social media.
Since you’re using WordPress for your blog, one of the easiest ways to add a custom contact form to your blog is using a robust plugin like WPForms.
Here’s an important tip: when you’re creating your blog’s Contact page, try to go beyond a simple contact form. In other words, focus on understanding why your readers would want to contact you in the first place. Based on this, you can also add a FAQ on your contact page.
Take my blog’s Contact page, which is centered around the topic of how anyone could “Work with Me’. Because many people want to hire me for their content marketing needs, it makes perfect sense.
By doing this, I automatically improve the chances of getting the right people to contact me. You can use your Contact page to set real expectations for your readers.
Alright ,let’s move towards the most crucial part of making your blog successful: creating valuable content that attracts the right readers and helps you convert them into business.
4. Write & publish your first blog post
The reason most people read a blog is not just about its design or how often it publishes. It ultimately comes down to how and if your readers care about what your blog says. So before moving any further, you need to be clear about why you’re doing what you’re doing.
- What’s your greatest motivation for learning how to start a blog in the first place?
- Why do you feel the topic you chose to blog about is right for you?
- Why should other people choose to follow your teachings, ideas or thoughts?
- Why do you think you’re qualified to cover this topic?
The best way to answer these questions is to pick a strong niche.
What is a niche? And why does your blog need one?
The niche you choose for your blog ultimately determines your approach, your audience, your voice and most importantly, your positioning. Which is why it should be something you favor or like. Whether it is cooking, gardening or knitting, at the end of the day, the niche has to interest you the blogger.
A niche gives your blog the needed focus.
The right niche helps you plan, create and execute the right kind of content, design and marketing for your blog.
The following questions will help you discover a niche:
- What’s the childhood dream that excited you the most?
- What makes you look forward to your day?
- What kind of hobbies interest you?
- What do you value the most?
- What’s your biggest achievement so far?
After answering these questions, you’re bound to have more clarity what’s driving you to learn how to start a blog now.
Next step: Finding out if your niche is profitable
If your goal is to start a money-making blog, you should target a blog niche that’s in demand. In other words, are people googling about it? Can you help them in some way and make money out of your blogging efforts?
Remember, it’s easy to create a business from your blog when you’re solving a real problem that people are facing. Use a niche demand checking tool (like the spreadsheet I’ve built below) to estimate how much demand there is for topics you’re considering as you learn how to start a blog:

Take your chosen blog niche and find 5–10 keyword phrases or topics related to it. If your blog is going to be about learning how to play the piano, you might go for keywords such as, “how to play piano”, “piano playing lessons”, “best piano resources”, “free piano training”, etc.
Next, you’ll have to learn how to do keyword research by entering your keywords into your Google search one by one. Tens of millions of results for a keyword generally means that there’s a demand for the topic.
If your chosen keywords have a Search Volume of 5,000 to 10,000 monthly searches, you’ve probably found a successful niche to learn how to start a blog in.
Lastly, I advise making sure to avoid highly competitive niches with large search volume—as you’ll be competing with large industry players.
Finding blog post ideas (using keyword research)
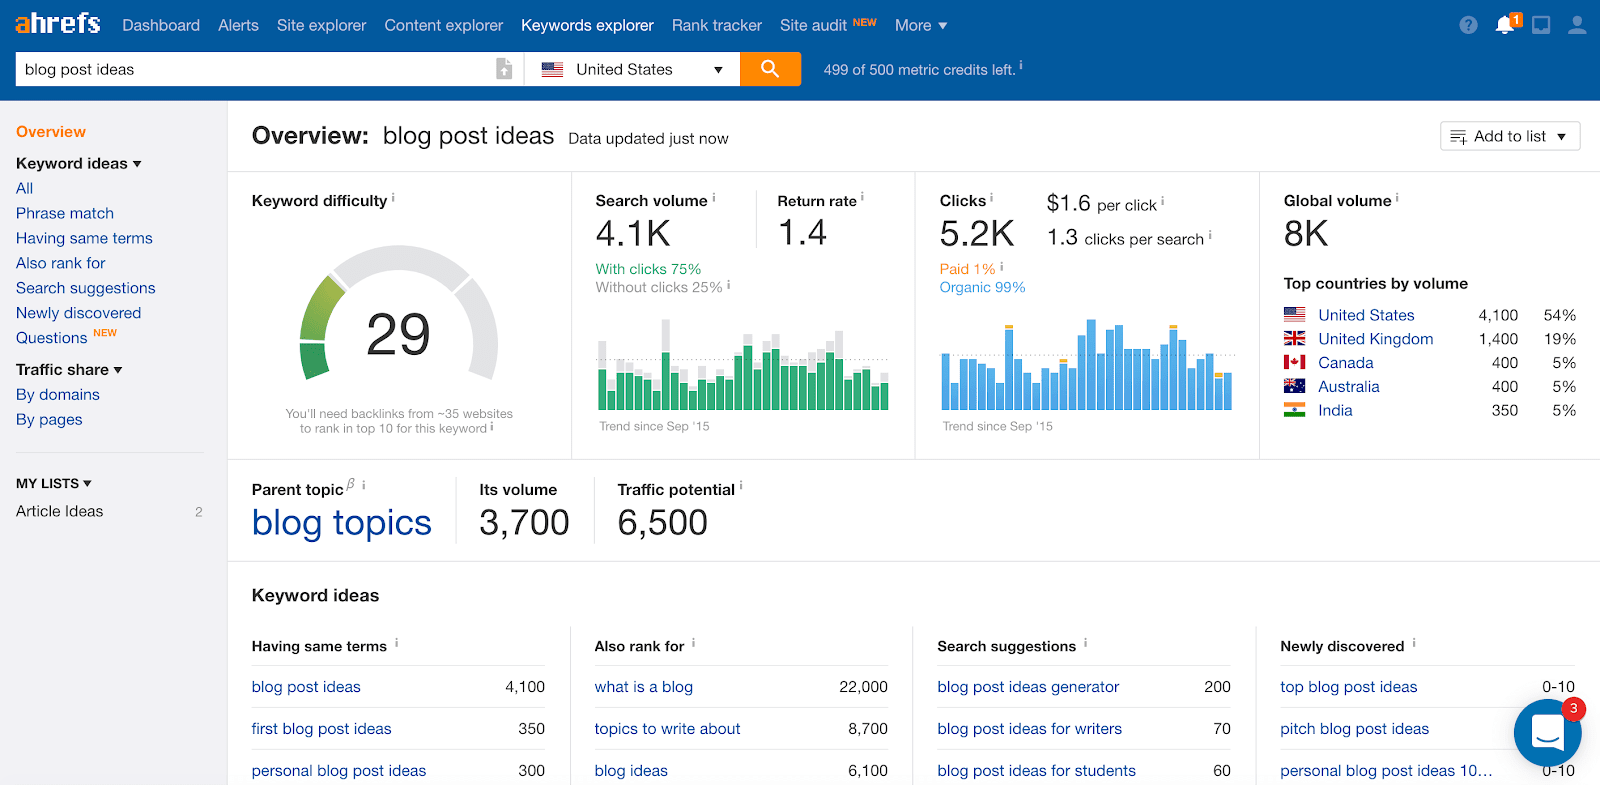
Finding a niche to blog about is only the beginning. You still have to conduct keyword research to find the right blog post ideas to work with.
Having a simple editorial calendar can make a world of a difference.
An editorial calendar helps you plan and identify what to write and when, saving you a ton of time.
Here’s how I come up with specific blog posts for my blog:
- Brainstorm topics: What kind of ideas would interest your target audience? Jot them all down.
- Use a keyword research tool: A keyword research tool like Ahrefs, Twinword Ideas (free), or Moz can help you uncover more in-demand topics related to your primary keywords.
- Bring similar ideas together: Refine your list of ideas by lumping all the duplicates together.
- Prioritize your ideas: Start a spreadsheet and organize your keyword ideas by search volume, difficulty, and opportunity. Give a 1-5 rating to each one in order to prioritize better.
- Outline the right content: Take the top-most keywords and create a deadline for each one of them. Make sure every idea on your list a) goes with your niche b) fulfills a real need and c) has the potential to bring in organic search traffic.
In order to generate more content ideas, I get creative by…
- Researching blog content within my space.
- Analyzing my successful posts from the past to find topics my readers liked the most.
- Interacting with other niche bloggers and brainstorming with them.
- Going through the previous mistakes I’ve made, and applying the the lessons I’ve learned.
This usually leads to a fully restocked content calendar, giving me a head-start and the needed peace of mind.
Still looking for more inspiration? Here are 101 ways to come up with winning blog post ideas.
One of the most important criteria for choosing a topic to blog about is the amount of organic search engine traffic it can drive.
Now it’s time to write your very first blog post
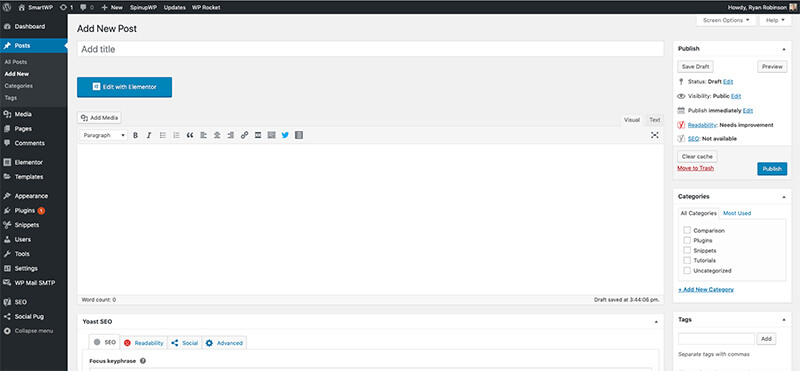
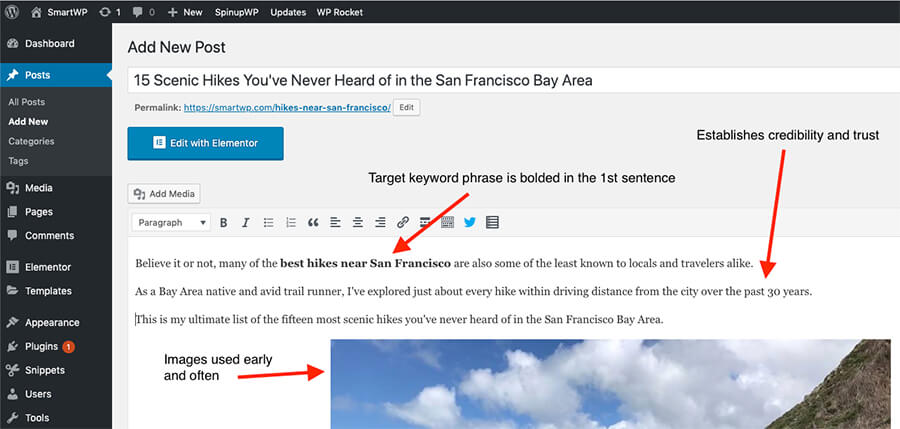
Alright, you’re learned how to start a blog and now it’s time to get into the content creation process. Once you know what your first post is going to be about, navigate over to the “Add New Post” section from the WordPress Dashboard.
Go to Posts > Add New:

You should now find yourself on a new article page, which looks like this:
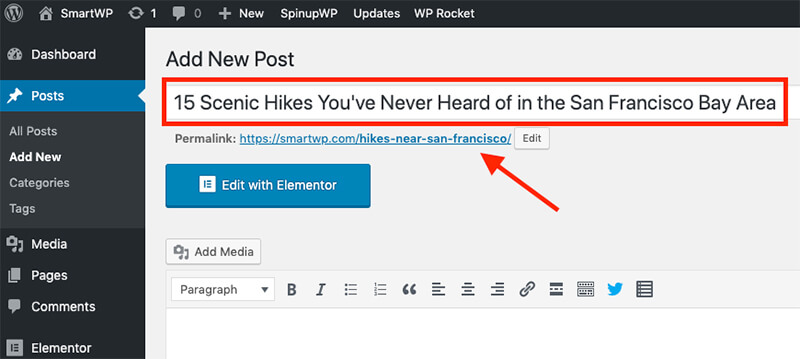
Writing a blog post headline that attracts reader attention and makes them click.
When you write interesting, engaging and relevant blog post headlines, you end up attracting the right set of readers. So it definitely pays to put real time and effort into creating each one.
For example, let’s say you’re learning how to start a blog about hiking. And after doing some keyword research, you determine that your hiking blog will discuss about some underrated hikes in Northern California.
You would click on the “Add Title” bar on your new post page and create a relevant title such as…
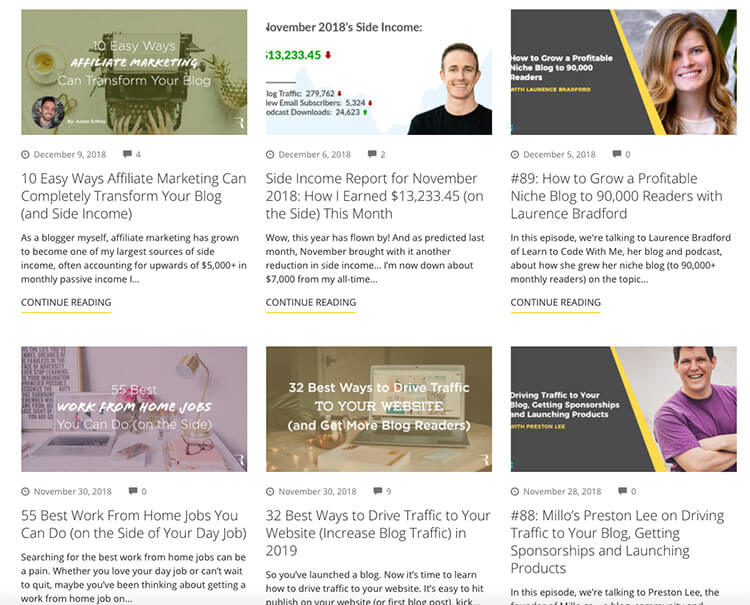
In order to get a good start at writing strong blog post titles, you can always learn by studying the headlines written by other prominent bloggers in your niche. These are my recent headlines from my personal blog.
When I first started blogging, I didn’t know how to create great headlines. Today, I have developed a proven formula through trial and error. One that helps me attract blog readers and retain them.
My key tactics to create successful blog post headline are:
- Using numbers (like 10, 32, 55 or 101) to grab attention.
- Creating a natural-flowing headline with the right blend of words.
- Making the headline unique by placing a part of it within parentheses.
- Above all, matching the headline intent with the reader’s goals.
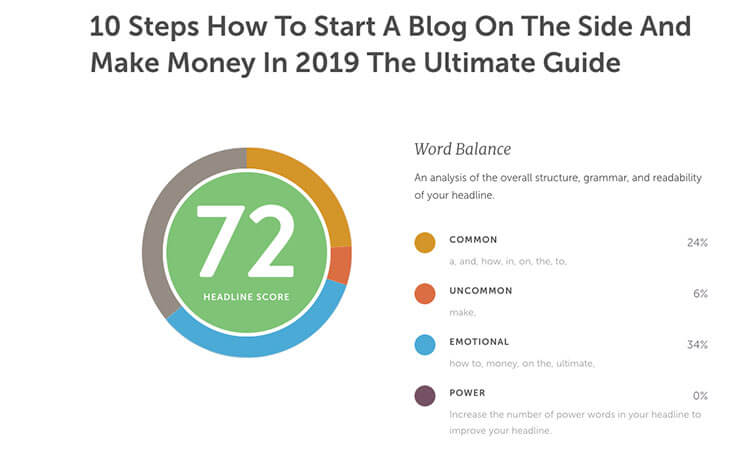
You can always test the strength of your headline with this free headline analyzer tool from CoSchedule.
Selecting an SEO-friendly URL for your blog post
In order to rank high in Google search results, you should make sure to customize the URL of your new blog post.
In the above example, I want the blog post “15 Scenic Hikes You’ve Never Heard of in the San Francisco Bay Area” for popular keyword phrases such as “hikes near San Francisco,” which is why I’ve chosen to include it in my post URL… /hikes-near-san-francisco
Here are a few more things to keep in mind when creating your URL:
- Make it more readable by separating each word in the URL with a dash.
- Don’t exceed 5 words in length (keep it short, meaningful and snappy)
- Use numbers only when it’s required
- Never ignore including your target keyword phrase
Creating a strong, inviting introduction for your new blog post
You don’t have much time to convince your readers to spend their time reading your post. Given below is a sample introduction that I quickly wrote for the hiking example:
Here are some do’s and don’t to help you craft a compelling introduction:
Do:
- Use bright, colorful language
- Start with a valid yet powerful statistic
- Add a relevant quote in the beginning
- Inject humor/drama into content
- Make smart use of formatting styles like bold and italics
Don’t:
- Add overused cliches that readers hate
- Ignore the unique selling point of your blog post
- Focus on what’s obvious.
The best way to ensure your headline works is to answer the who, what, where, when and why without wasting much of the reader’s time.
Get to point as fast as you can. Aim to show your readers why your post is relevant and useful to them.
Optimizing the design (layout) of your blog posts
When it comes to looks, you may already have a certain image of what your readers will identify with.
However, you may want to apply the following time-tested design principles and tips that have always worked for me:
1. Make each blog post easy to read
Forget going crazy with your colors and fonts. Be professional and focus on giving your readers an experience they deserve. Remove/replace what’s not needed and leverage the power of simplicity to make your blog stand out.
White space is easy on the eyes, so avoid using design elements when not needed. Also, make your content more readable by using font size that’s big enough. Last but not the least, keep the line length restricted to 50–85 characters.
Experiment with different fonts and spacing options to find something that looks comfortable to you. Be unique, but not at the expense of your reader’s experience.
2. Add a relevant featured image at the top
One of the main objectives in learning how to start a blog, is making your content memorable—which requires you to appeal to your readers both verbally and visually.
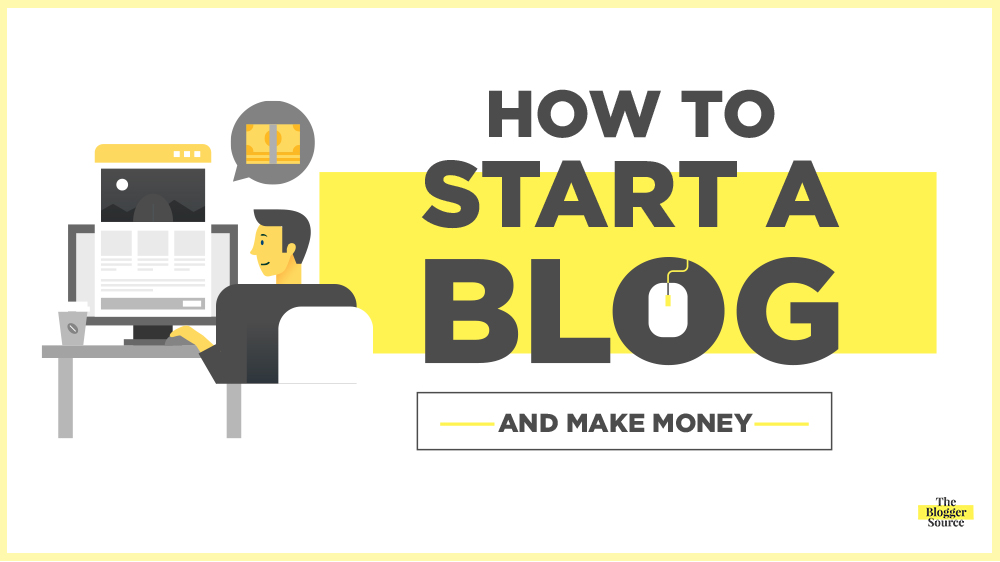
For instance, here’s the featured image from this free beginner’s guide on how to start a blog here:
You can always connect with your readers better when using a relevant featured image (plus it might just be the reason they decide to click on your content in the first place).
3. Use sub headers to break up text
People getting tired of reading your content and leaving your blog for good… who wants that, right? Nobody. Which is why I suggest adding a subheading (maybe along with images) every 300-500 words to make the reading experience smoother.
4. Use styling to draw attention to important parts of your post
It’s always a good idea to emphasize important parts of your post with styling elements such as bold and italics. Here’s an example:

This tactic really works to grab reader attention, unless you choose to overdo it.
5. Show people where they are
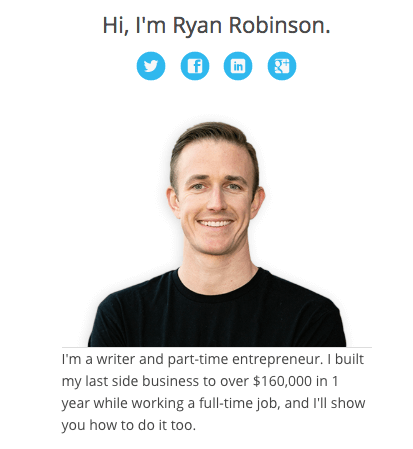
The first page people land on your website via organic search may not always be your homepage. So in order to make them feel comfortable and build a real connection with my blog, I always add a short blurb about who I am at the top of the page:
This lets people know where they are, and also sets proper expectations should they choose to stay.
Publishing your first blog post
Once your first blog post hits the 1,000+ word range, you’re ready to go!
Spend some time double checking on the Yoast SEO suggestions and see to it that your blog post is SEO-friendly as it improves your chances of ranking in Google.
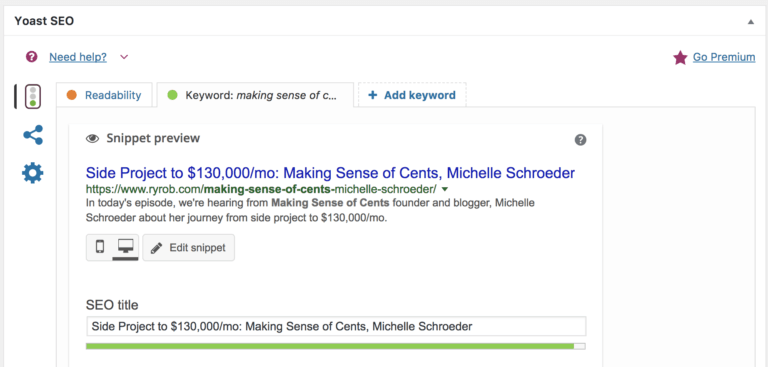
When you’re done with your SEO settings, select a “Category” for your new post before you hit publish.
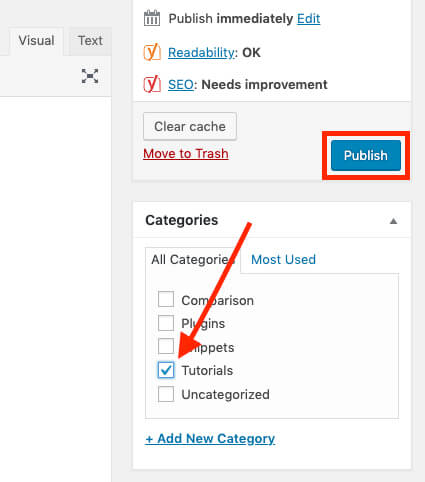
That’s how easy it is! 🎉
You just published your first post all on your own, and you’re well into your journey of learning how to start a blog that becomes successful 👏
Now, let’s move over to what comes immediately after publishing your content when blogging—promotion and devising how you’ll start making money from your blog.
5. Promote your blog and make money from it

By now, you should already be in a great position when it comes to learning how to start a blog, creating valuable posts, and adding beautiful design elements to your site.
But there’s one important area that doesn’t get the attention it deserves: Promotion.
Once you hit publish, you need to start driving traffic to your new blog post. But how do you do it effectively?
It’s a question I hear time and time again. And it’s one that separates the great blogs from the ones that are only read by your mom and crawled by spam bots.
I’m a strong believer that you should spend more time promoting a post than you did writing it. So, where do you start?
Here are a few of the best ways to start sharing your posts and getting in front of new readers.
Using social media for your blog promotion
Social media is where the real action is, and will be a very useful tool as you learn how to start a blog and get readers to it.
Whether it’s Facebook, Twitter, Instagram or Pinterest, as long as you choose a platform that works for content within your niche, you’re good to go.
The blogging team behind Chasing Foxes (made up of a husband and wife duo), swear by Pinterest when it comes to driving millions of readers to per month:
“I learned that Buzzfeed will put out multiple images for a post and so I decided to do the same thing. I’ll create 5 or 6 Pinterest pins per post with sometimes different titles or images. Once we started doing that, that’s when I started to see a lot of traffic come through.”
The reason Pinterest worked for them is because they got innovative. They weren’t afraid to experiment. You should do the same and see what works for you in your niche.
Not every social network is the same. Different networks appeal to different people. But if you look closely, you can find a pattern that works best for each of these platforms:
- Facebook: Videos and curated content
- Instagram: High-res photos, quotes, and Stories
- Twitter: News, blog posts, and GIFs
- LinkedIn: Professional content and career news
- Pinterest: Infographics, step-by-step photo guides, visual content
- Reddit: Comments about topics in your niche
Yes, it can be overwhelming. But given that there are multiple tools out there that can help you efficiently manage your weekly social media content, it can get easier. Here are the ones I recommend:
- Buffer: Arguably, it’s one of the simplest tools that gets the job done when scheduling social shares well in advance for Facebook, Instagram, Twitter, LinkedIn and Pinterest.
- Hootsuite: Looking for a more advanced solution? Then Hootsuite works great for effective social sharing, scheduling and efficient monitoring.
- Gain App: If you run a multi-author blog, then Gain is the tool you need to collaborate with your bloggers and control what they post from your account.
Blogger focused forums and message boards
Often, just throwing your ideas out into the social media void isn’t a very smart strategy. Instead, being an active part of targeted forums and online communities can give you a way better return on your time investment. That is if you find the right ones.
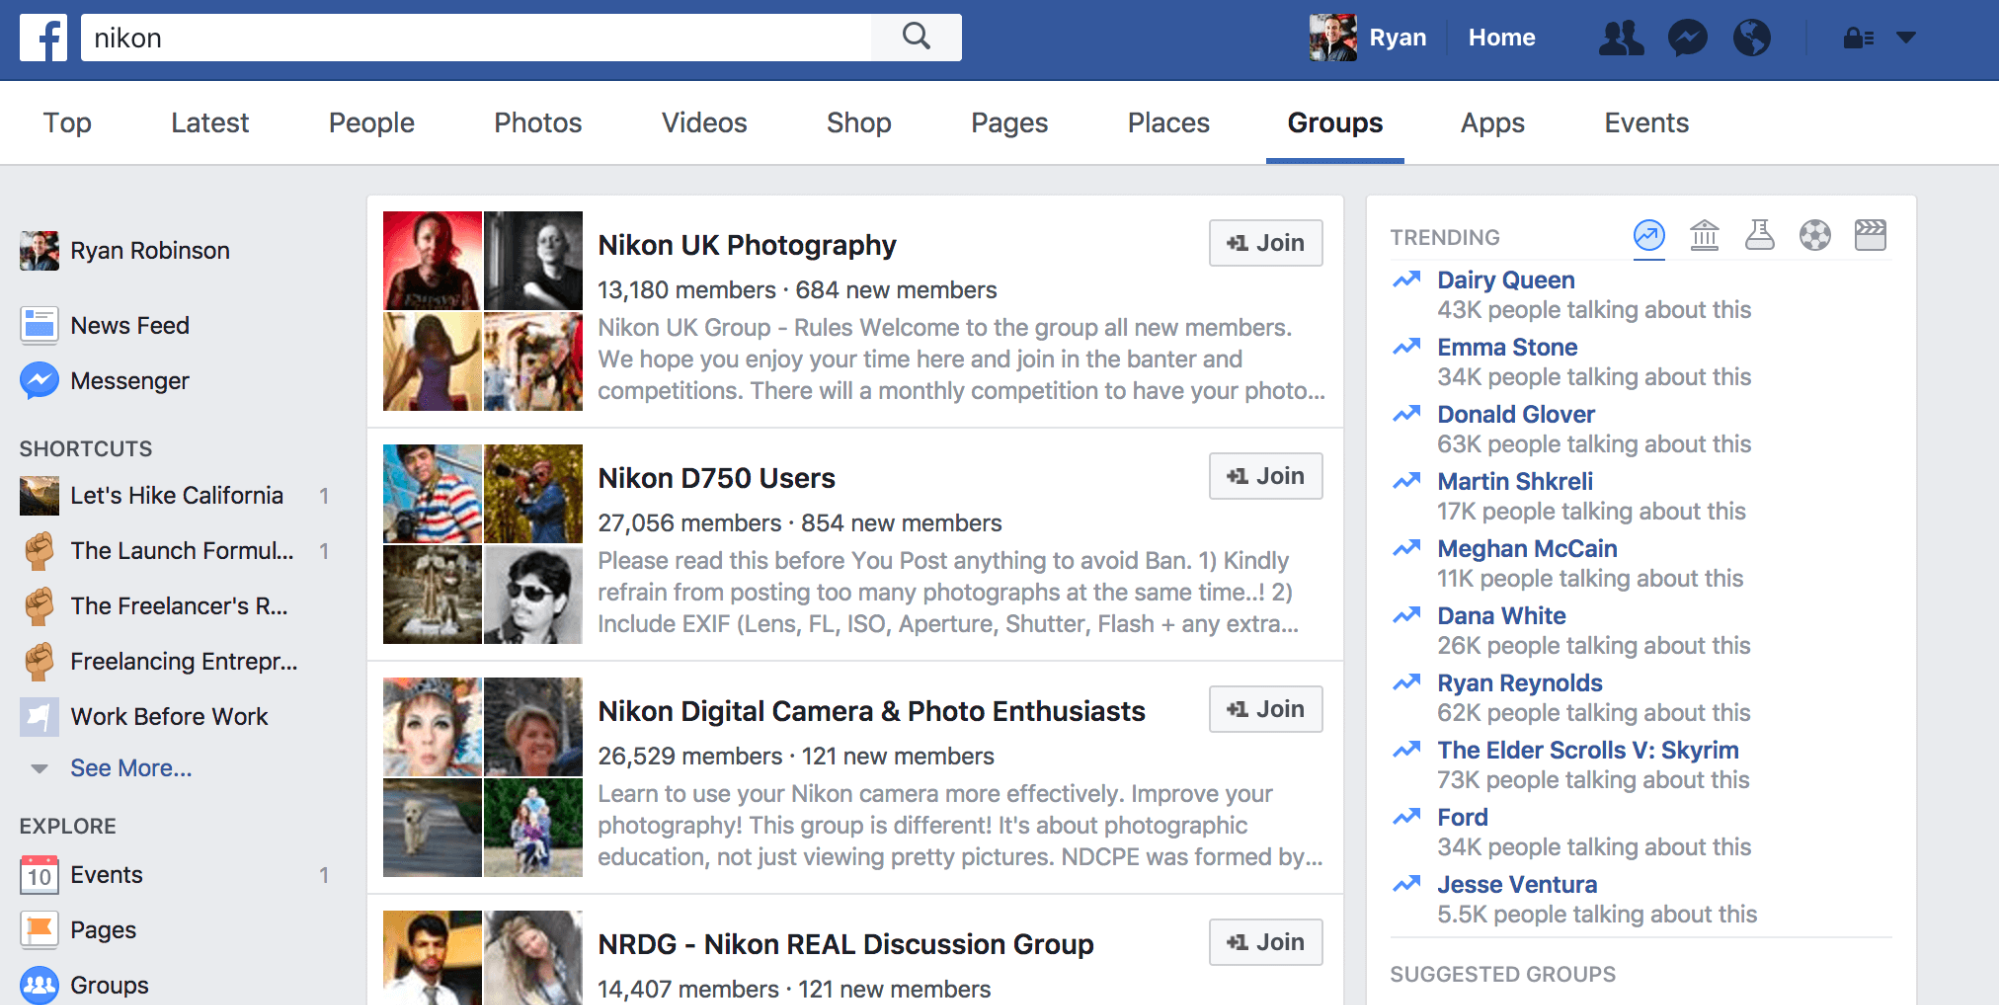
Look for a topically relevant group to join. For example, if you’re making a blog about wedding planning, you could consider joining Facebook groups like Nikon Digital Camera & Photo Enthusiasts (26,000+ members), Nikon D750 Users (27,000+ members) and Nikon UK Photography (13,000+ members).
Since your blog would be relevant and interesting to literally anyone who is planning their wedding, you won’t have trouble finding enough people who want to consume your content.
Your aim here is to find and join groups with at least 5,000+ members. But what if your search doesn’t lead to any relevant Facebook groups with a sizable audience? In that case, you may want to look for general Facebook groups that go with your niche. Or search for niche groups on LinkedIn or Reddit.
For instance, if your blog is going to be about business or entrepreneurship, then you could try posting your content to:
Facebook Groups (Entrepreneurial):
- Freedom Hackers Mastermind (39,000+ members)
- The Smart Passive Income Community (28,000+ members)
- The Joyful Entrepreneur (37,000+ members)
- Heart-centered, soul driven entrepreneurs (16,000+ members)
- Coaches, Authors, Entrepreneurs (13,000+ members)
- Women’s Entrepreneur Network (32,000+ members, women only)
- Super Hero Entrepreneurs (10,000+ members)
LinkedIn Groups (Entrepreneurial):
- On Startups (626,000+ members)
- Future Trends (474,000+ members)
- I love Startups (248,000+ members)
- Entrepreneur’s Network (33,000+ members)
- Band of Entrepreneurs (26,000+ members)
Reddit Sub-Channels:
Make good and ethical use of these groups. Don’t just dump your links onto them and think it’ll lead to results. It won’t. Instead, give value before you ask. Build relationships and engage with others. Make it happen, slow and steady.
Guest blogging and posting to communities like Medium, Quora, Linkedin, and others
Learning how to start a blog is an amazing, fulfilling adventure in itself. But what makes it absolutely worth it is the kind of welcoming community you become a part of. Bloggers always, always love to help each other out and connect via methods like guest blogging.
Guest blogging on other relevant, targeted blogs is by far THE most proven way to not only build a relationship with other bloggers, but also connect with an already established audience within your niche. Make sure to check out my ultimate guide to guest blogging here.
I’ve been an avid guest blogger with hundreds of guest posts under my belt. In my five years of guest blogging, I’ve found it to be the single best and effective strategy to get the word out about my blog content while building a real audience of my own. And I’m not only the blogger that feels this way about guest blogging.
As Laurence Bradford of Learn to Code with me told me in her podcast interview:
“When I first started my blog, I started guest posting really early on. I’d make spreadsheets and reach out to editors and other bloggers. It definitely took a while to gain traction. I went through a lot of rejection, but over time it became easier because I’d built this portfolio of other things I published.”
The strategy Laurence applied is something you can apply to your own blog. She began by going after smaller coding blogs and sites that shared a similar audience to hers.
In your early stages, you may want to syndicate (a.k.a repost) your blog content on sites like Medium—a free social blogging platform that’s growing at breakneck speed. It has some very popular publications that you can publish your post in. Don’t think twice. Go find one within your niche and submit your blog post to it. Once accepted, try to find more.
Next comes Quora—a highly successful question and answer site. Once logged in, you could try searching for relevant topics related to your niche area and then answer questions by sharing useful information. These answers can be summaries of your existing blog posts that you can link back to and drive traffic.
If you’re picking up how to start a blog because you’re going to be targeting other businesses (B2B) with your content, then you might also consider posting your new articles to LinkedIn.
The idea is to look for all those places where your target audience hangs out and then get your content in front of them. These distribution channels can work wonders for your blog promotion if you’re consistent in your approach.
Leveraging an email newsletter that grows your blog readership
Result-oriented blog promotion is not just about reaching out to new audiences. It’s also about connecting with your existing readers. An audience that already knows you and trusts you.
An email newsletter is still an underrated yet powerful way to keep your readers coming back for more. The more they read your blog posts, the more they get excited about your work. Regardless of what you plan to sell on your blog in the future, this may lead to more signups, sales, etc.
Building your own email list is not rocket science. In fact, it’s easier than you think—if and if you take the right steps without being hasty.
For starters, add a signup form in your blog content and on your website. Or, take a smart approach and do what Learn to Code with me founder Laurence Bradford did—offering special, useful content to people in exchange of their email address:
“If you have a blog post on your site and you have some sort of checklist or book they can get just by giving their email that can work really well. I still get around 50 new email subscribers a day just from old posts that have these content upgrades.”
Personally, I use and strongly recommend a tool called ConvertKit. It’s my secret email marketing weapon that helps me manage my 100,000+ subscriber list on my blog.
But if you’re looking for another option, MailChimp is probably the best email marketing tool that you can start using for free.
How often do I email my list? Since I learned how to start a blog and began collecting subscribers, I usually send them an update whenever a new blog post goes live, have an important/useful resource to share or when I’ve finished recording a new podcast episode.
In short, I get in touch with them only when I have something worth sharing. I personally see email marketing as the biggest driving force behind my blog’s growth in terms of growth and revenue.
Other useful ways to promote your blog and increase traffic
Besides promoting blog content via social media, email marketing and guest blogging, here are some other techniques that I personally vouch for when it comes to transitioning from how to start a blog and into growing your blog audience quickly:
- Interview niche experts: There are two strong advantages of interviewing famous people within your niche: a) you get to pick their brains and learn from their experience and b) you are able to build a real relationship with them to leverage later. You can always use these interviews as a base for your blog content. Or start your own podcasting journey.
- Network with other bloggers and name-drop them: When you’re just starting out, you want to get on the radar of the known bloggers in your niche. And a proven way to do so is to name-drop or mention influential bloggers in your blog content.
- Discuss with other people about what you’re doing: Sounds simple, right? But it works great guns. Telling people around you about what you’re doing can get you noticed in more than one way. So don’t hesitate to show them your excitement about your blog and let them know whatever you’re focused on. As Gaby Dalkin of What’s Gaby Cooking told me: “Maybe it’s just your friends reading you to start, but you should be responding to every comment and going out and commenting on other blogs. This is essentially your industry and these are your coworkers.”
- Learn from other top bloggers: It’s okay if you’re not ready or comfortable to go out there and connect with other bloggers within your niche. What you can do instead is learn from what they’re doing with their own blogs. For Silas Moser, one half of Chasing Foxes told me, you should study people who are good at what you’re doing: “Look at what works for them and see how you can use it. So many people told us ‘you could never make money from a blog.’ But you don’t have to reinvent the wheel. There are tons of successful bloggers out there that you can learn from and see what they’ve done and apply that to your niche.”
Let’s now move on to the really crucial component of what makes a blog make it big or successful: learning how to (eventually) monetize your blog.
8 best ways to make money blogging (monetizing your blog)

While I’m all for learning how to make money blogging, it’s still the very last step in my “how to start a blog” guide.
The reason being simple: when you’re in the initial stages of blogging, you should not at all worry about monetizing your blog. Because it’s a little too early to focus on the “making money” aspect of it.
You need to take care of many other things before, such as…
- Finding your readers and growing your audience
- Building a lasting relationship with them
- Creating a community around your blog that trusts you
- And above all, keep giving them valuable content before trying to sell them your product, service, etc.
Blogging is a real investment that can give amazing returns, but it’s really a long-term game.
Now that we’ve got that out of the way, let’s dive into the 8 solid ways you can monetize your blog.
1. Sponsored Content.
What exactly do we mean by sponsored content? Usually, it’s when someone (could be a company or an individual) pays you a certain fee to promote their offer (in the form of content) to your blog readers.
Your goal should be to do sponsored content without pushing away or alienating your readers. And the best way to do that is to weave the offer into your typical publishing style. Given below is a snapshot of my first year’s traffic to my main blog (in orange) when I started blogging—and my second year of traffic (in blue).
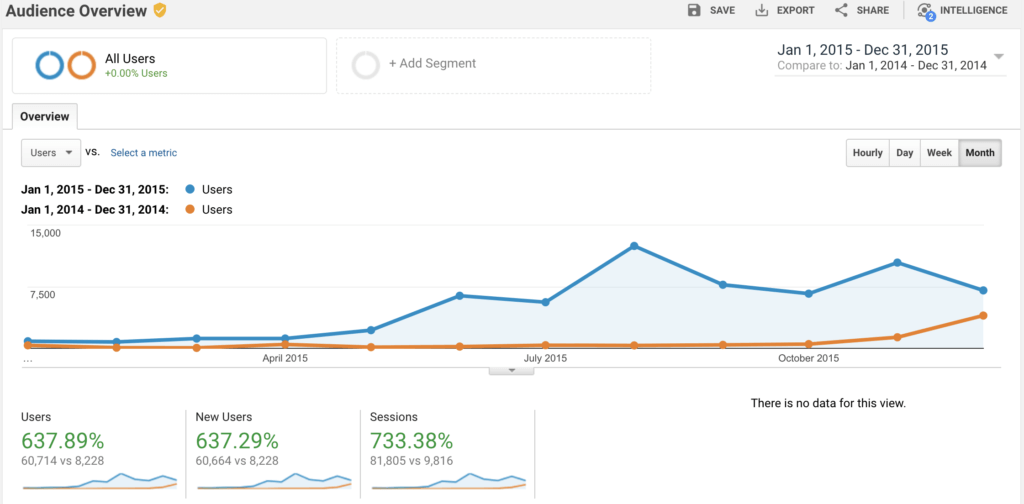
As you can see, my first year of blogging was slow with only about 9,000 readers in total. But that’s only because I wasn’t really putting in the needed effort or taking blogging seriously. I was still in the process of learning the ropes of generating traffic.
However, if you notice, in my second year of blogging, the traffic dramatically picks up. This is when I begin to actually figure out who my target audience is and what really appeals to them. Which gives me a better understanding of what traffic strategies apply to my blog best. The result? I started to drive massive amounts of traffic every single month. My monthly traffic was now equal to the traffic I had gotten in my entire first year! Talk about growth!
I had finally reached a point where my readership grew to an amazing 10,000 monthly readers. And this is when I knew I could comfortably start commanding the market rate for sponsored blog content.
But, you can learn how to start a blog today—and not wait before you begin making money from it. There are easier and quicker ways to begin monetizing your blog. Such as…
2. Freelancing (Selling Your Services).
The fast and proven way to make money from your blog is to sell your services. In fact, I still freelance today because it works:
Securing your first freelancing client gets easy when you have a strong pitch up your sleeves. Choosing to start a blog and create strategic content, you can showcase your work examples/samples and confidently pitch your prospective freelance clients.
No work samples? No problem. Spend some time creating high quality examples of what you can do (articles, designs, etc.) and you’re good to go.
If you have bankable skill that you can sell as a service, you can start pitching clients right away. Your skill could be anything…
- Writing
- Design
- Photography
- Marketing
- Developing
- Public relations
- Social media management
- Virtual assistance
- Community-building
- SEO or paid advertising campaigns
- Business strategy or project management
- Basically any skill that can be used to monetize
Now, let’s talk about more scalable ways to learn how to start a blog and make money from it.
3. Online Courses.
Armed with the right skillset or experience, you can easily package/convert your knowledge into a profitable online course and help others lower their learning curve.
For instance, my premium online course on validating business ideas generated over $20,000 last year. If I can, so can you.
The best part is you don’t need a huge audience to launch an online course. Start building a relationship with your handful of blog readers by giving them real value. Learn about their challenges and see how you can help them. This is the very first step to seeing big sales from a small audience.
Once you come across a real problem to solve for your readers, pitch them on pre-ordering your course or apply for direct coaching from you. It’ll help you flesh out course material that people want.
This will do two main things for you:
- First, when you go out there and ask people to actually pull out their credit card, it quickly validates your idea and proves that you’re working on a problem worth-solving.
- Second, you’ll find the needed help from real-world customers (or test subjects) when building/curating your online course content over the coming weeks—where your course content can deliver actual value as a result of your direct coaching time.
I highly recommend going through an idea idea validation framework and applying what you learn. The reason it works so well is because it helps you focus on pre-selling your course to a small group of interested early adopters. You’ll be interacting with these “beta testers” one-on-one and understanding their needs.
This is particularly valuable if you’re learning how to start a blog with the eventual goal of building a real business around it. This lets you test and refine your course material to ensure it actually solves your reader’s burning problems/challenges.
This process works because it’s what I have personally applied to all my online course launches (even to the tiny ones). As a result, I earned five-figures from every single course launch.
4. Traditional Blog Ads (Signing Up for Ad Networks).
If you look at most blogs right now, you’ll find a small (but relevant) ad in the right sidebar, like so…
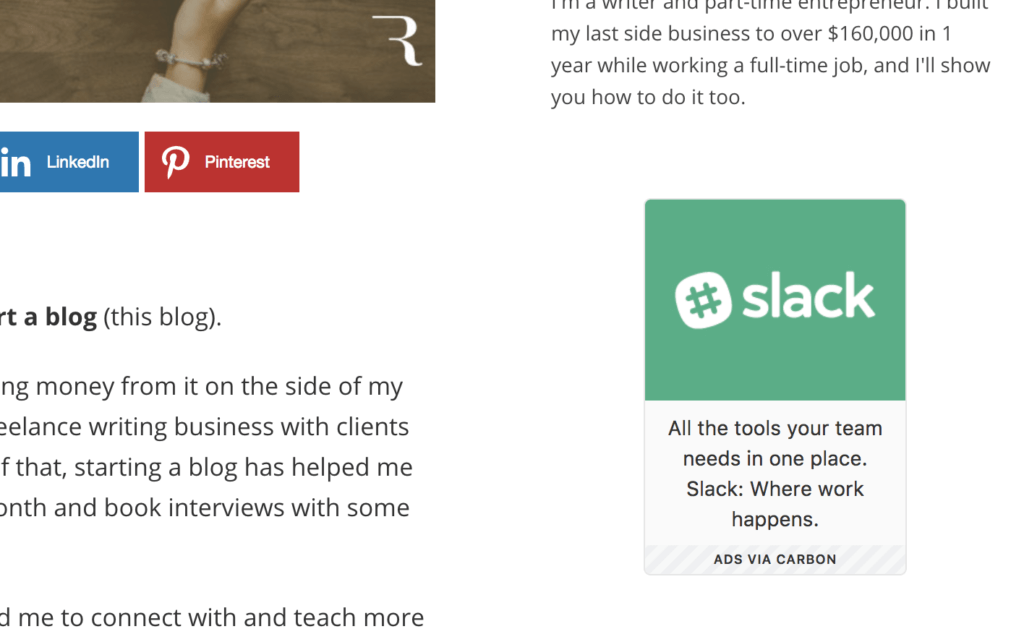
I have a membership in a smart ad network known as Carbon Ads with my other main blog, that does a great job connecting bloggers with topnotch advertisers like Asana, Slack, Freshbooks, etc. Some of my most popular blog posts with high traffic have small ad placements through this very network.
Today, I’ve gone from how to start a blog to now getting over 500,000 monthly unique visitors, which is a pretty sizable figure. But it’s still not enough to make big money with just ads.
Being a member of this ad network, I only make as little as $1,000/mo. Sure, there are many other ad networks that offer higher rates (cost per click and cost per 1,000 impressions), but aren’t as niche as Carbon Ads. I may earn less with them, but I at least I am able to advertise brands that I resonate with.
Other popular ad networks that you may want to work with for your blog include MediaVine, BuySellAds, Propeller Ads and of course, Google AdSense.
Overall, traditional advertising can only be really profitable when you’re driving over a million monthly visitors to your blog. So unless you plan to take your blog to that level, this is one monetization channel you should reconsider. It’s just not worth the effort in the short-term.
However, if you’re thinking out of the box and have found a way to generate large amounts of traffic to your blog, then ads are a proven way to turn on the profit faucet and monetize your readership in one go.
5. Podcast Sponsorships.
Podcasting may look complicated, but it’s actually fun to do. It’s also an interesting way to monetize a blog. Launching a podcast for your readers can open new doors to sponsorships from brands that want to reach your type of audience. Armed with your traffic numbers and early listener statistics, it’s possible to book sponsorships from brands you connect with.
Here’s how my podcast grew over its first year:
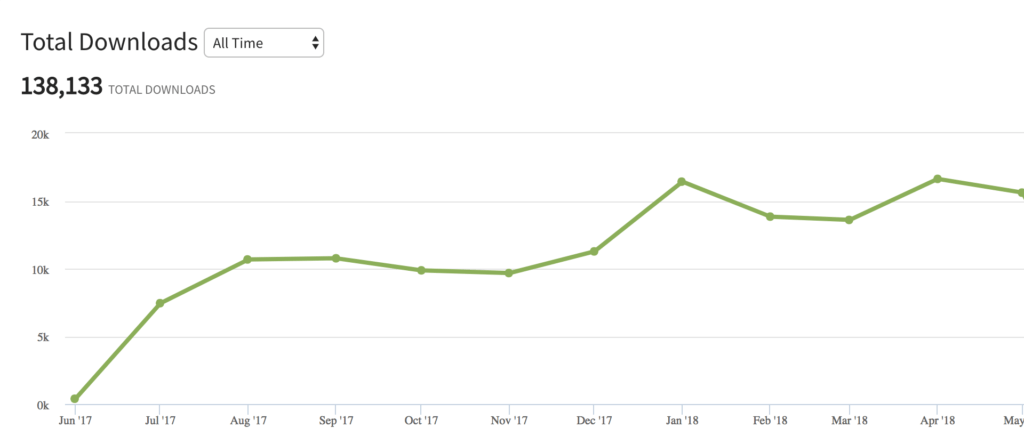
You may even try to give a more juicy deal to interested brands by combining your podcast ad placement offer and your sponsored blog content.
The most exciting part about doing podcasts is you get to speak with and interview interesting industry experts. Even some of the super-busy influencers in your niche become more approachable when you start asking for interviews. And why not? They get more exposure, and you get great content. It’s a win-win situation.
When I first launched my podcast, my blog had already reached a certain stage. I had close to 100,000 monthly blog readers and 20,000 targeted email subscribers to tap into and have decent early listenership numbers. Which made it fairly easy for me to sell an early sponsorship slot for 10 episodes to a reputed startup like Freshbooks. I charged $500/episode and it worked to help me fund the show.
Like I mentioned above, this only worked because I learned how to start a blog that had already achieved sizable growth. However, when you are starting out, you won’t have much traction. Which is why I recommend you get a few good episodes recorded and done. Launch your show without focusing on sponsorship; it can come later.
Once you release a fair number of episodes, leverage the following that your interviewed guests have already built. Ask them to share the interview with their communities. You can even reach out to those who you have mentioned in the interview. Alternatively, you can grow your podcast listeners by simply appearing (as a guest) on other podcasts in your niche. Just make sure the podcaster is an established one.
6. Affiliate Programs.
Earning a monthly passive income is a dream for many—one that I’m living, thanks to the top affiliate programs for bloggers that I’m a member of. In fact, since growing beyond the how to start a blog phase of my journey and into more complex monetization, affiliates have become my largest source of income.
Affiliate programs aren’t complicated. Here’s how they work:
When you become an affiliate of a certain company (or merchant), you get a tracking link with your special code. You then embed this link within your blog posts, in the emails you broadcast to your subscribers, or wherever you think is relevant for your readers. Whenever someone clicks on your tracking link and completes an action (such as purchasing a product, signing up for a free trial, etc), you either earn a commission of the sale or a certain fee that the company has set.
In short, you’re earning compensation for referring new leads or customers to companies who are your affiliate partners.
If you look around, you’ll find that some of the well-known brands have their own affiliate programs. Companies as big as Amazon to smaller brands in various niches (like CreativeLive, Skillshare and Udemy in the education space) all have well-paying programs. Here’s what I have recently earned from just a couple of these programs.
Also, it has been proven time and again that you don’t really need to become a member of an affiliate network to begin earning.
My good friend Preston Lee runs Millio, an active blog and community focused on freelancers. He recently launched a paid weekly email newsletter called SolidGigs, where he’s trying to help freelancers find work by sharing with them the best gigs for the week.
Since my audience is largely made up of freelancing professionals, Preston offered to strike an affiliate partnership with me, where I’d be earning a set fee for every new paid subscriber I referred to him. I accept his offer, and the next thing I know is around 100 people signed up for SolidGigs through my tracking link. All I had to do was to send out a simple email about it to my subscribers. What’s more, I continued to earn even more over a long period of time from his program, which obviously helped me increase my recurring income to a good extent.
There you go! You do not need to limit yourself to finding affiliate opportunities on major networks such as Commission Junction, Rakuten, ShareASale, Flex Offers, etc.
You can and should go beyond as soon as you have managed to build a small audience that trusts you. Because when your readers are engaged and connect with what you share with them, it’s the perfect opportunity to go out there and strike affiliate deals with SaaS companies, startups, brands and solopreneurs. They’re waiting to partner with bloggers who have an interested audience.
7. Physical Products (eCommerce) and Software Tools.
If launching your online course can help you earn via your blog audience, then so can selling physical products or software tools to your readers. If you’ve been planning to start your own eCommerce store to sell relevant products, then this monetization method should work great for you.
At the end of the day, it’s all about solving real problems and offering effective solutions to your blog readers.
For example, take the inspiring story of Matt Nelson, creator of the We Rate Dogs brand…

When I sat down with him to conduct a podcast interview a few years ago, he had only begun to creatively monetize his Twitter following, so he still had to learn how to start a blog. Still, his following was made up of millions who were interested in his “cute” tweets with happy dog photos that were published with witty, humorous captions.
Nelson has since come a long way. His blog and social following is no longer just about “feeling good”, but has turned out to be a serious eCommerce business where he sells stuff like t-shirts, mugs, hats, card games, socks, pillows, stickers, dog tags, and so much more.
At first glance, it doesn’t seem a unique idea or business. But it’s profitable, and that’s all that matters to Nelson who runs his business without even stocking a product inventory.
With the availability of print-on-demand services, he can easily fulfill orders after he has received them. And as for warehousing his products, he can leverage order fulfillment centers that stock/ship items that are highly popular. Which means he doesn’t have to pack and ship products from his own place.
Thanks to the advancement in eCommerce technology, the labor intensive part of such a business is easily taken care of. Making it easy for bloggers like you to monetize their readership and earn real profits.
Also, besides promoting and selling to your own blog readers, you can take advantage of loyalty programs, where customers receive attractive incentives to invite other buyers with offers such as free one-month trials, first-time customer discounts, gifting programs and lots more. This allows you to spread your message further and get more exposure to your products through the sheer power of word-of-mouth marketing. Which is usually much cheaper than traditional advertising.
Getting started with your own eCommerce business is not at all hard, as long as you’re thinking about it the right way and taking targeted action. Here’s how you may want to approach it…
Instead of thinking about scaling at first, think about first finding that product-customer connection. Build a stable relationship with 10 to 20 of your early blog readers and leverage it to focus on a challenge or problem you’re interested in solving with a physical/digital product.
Work on repeatedly solving this problem yourself. After which you should be in the position to create a solid plan of action to help those 10 to 20 people facing this problem. Although this step doesn’t scale, it’s necessary to understand your target audience, their problem and the kind of solution they’re looking for.
Next, get in touch with these 10 to 20 blog readers and ask them to “pre-order” your product. The idea is to directly work with each one of them via a personal coaching regimen. The information and knowledge you gain through this process will be gold as it’ll help you develop a product that has all the needed features. Because after all, it’s your customers who are going to use it. And it’s important that your product should successfully solve their problem.
Once you’re done validating your product idea, you’ll have a solution in front of you that’s not based on assumptions, but rather built on a strong foundation to help your readers in the best possible way.
8. Business Partnerships.
Even though business partnerships are extremely common in the blogging world, they’re still unpredictable as a blog monetization method. Take that in a good way because as your blog grows and goes to the next level, you’ll be able to meet many interesting people through it. The possibilities to create new partnerships are limitless. You never know who you’ll meet and when.
Imagine if I had quit my blog right after I started. Only because I stuck to blogging consistently was I able to meet amazing entrepreneurs, connect with them and their journeys.
For instance, I’ve collaborated with my good friend Jory in the past (who’s a prolific writer and a content marketer). I wouldn’t have met Jory if it wasn’t for my blog. We connected on a big level and ended up starting another blog together that we run as a side project outside of our other work.
I’ve launched new and interesting websites (like SmartWP) with other reputable bloggers too. Bloggers who happen to have a similar audience to my own and are always interested in connecting.
Sometimes these relationships start out of nowhere and go on to become loyal friendships and lucrative partnerships. For example, one of my former podcast guests is helping me create a software tool that has been on my mind for a long time.
Now, just the way you cannot engineer “viral marketing”, you cannot really engineer such partnerships—they just happen. All you have to do is focus on increasing the strength of your personal brand along with your blog’s reach. And then when you have creative professionals come to you with their ideas, accept them. Be receptive in every way.
Now, let’s look at it from the other side. If you want to collaborate with a business in your niche, have a strategy to add real value to it. See how you can give first before receiving.
Work on gathering and connecting with people you know who these influencers would be interested in connecting with. Focus on building a real-world relationship with each influencer first. And then move towards pitching them your idea and see how you can collaborate.
6. Create a smart long-term content strategy

Like I mentioned above, most of the articles that you read online about how to start a blog are limited in what they teach.
But I believe it’s important to not only learn how to create and launch your blog, but also how to take it to a level that you would be proud of.
Over the years, I have managed to increase my blog’s presence and grow it to a level where I consistently get millions of interested visitors. My traffic keeps growing thanks to the solid foundation I have built.
And this didn’t happen on its own or by sheer accident. I was lucky enough to apply the valuable content marketing lessons I learned from some of the most amazing companies. Besides that, over time I was able to learn how to create worthy blog post ideas that people love.
In short, I now have a solid content strategy for my blog that works.
So why focus on having a content strategy when starting a blog?
Creating a successful “content strategy” may sound like a difficult thing at first. But when you actually do it, you’ll know it’s pretty easy.
A strategy is nothing but a plan for action to apply things you already know. And having one for your blog content creation/promotion puts you way ahead of other bloggers.
- If you know and understand your niche…
- If you know the needs/wants of your ideal reader…
- If you know your unique selling proposition and the value you want to deliver…
Then forming a content strategy boils down to simply solving your readers most challenging problems.
Having a real content strategy keeps you motivated and moving forward at all times. It allows you to keep pushing the envelope and gives you ideas to write about when you feel like giving up on your blog.
With that said, here’s how you can form a solid blog content strategy:
1. Define your blog’s main objective
What goal do you want to reach with blogging? Is it more traffic? Readers? Email subscribers? Leads?
Knowing your goal early on is an easy way to build a solid foundation for your blog. As marketing maverick and top blogging Seth Godin explains: “You have the freedom to make these choices at the beginning when they’re free, fast, and easy. Not later on when you’ve made commitments.”
When you know and understand your main reason or goal for blogging, you’ll know how to define mini milestones that you need to reach to get there.
2. Get to know your readers well (and where they spend time).
The kind of readers you attract matters. Because it ultimately determines how successful your blog is going to be. And to create content that resonates with your target readers, you need to understand them like the back of your hand—which is why it makes sense to write for yourself.
I strongly believe that who you write your blog content for is as important and necessary as the blog topic you will be covering.
In many cases, you yourself will fall into the “ideal reader” bracket. But doing your homework on your audience and researching what they want definitely helps you create content that gets results.
To begin with, start by thinking about the demographics and psychographics of your target audience:
- Demographics: Your blog readers’ quantitative traits. Which includes age, gender, location, job title, etc…
- Psychographics: Your blog readers’ more “unmeasurable” traits such as values, interests, attitude, and also their belief systems.
As soon as you have these qualities written down on paper, you’re ready to find an audience persona—call it a fictionalized version of your perfect blog reader.
Which can look something like this…
A work-from-home blog targeted at Jason, a 20-30 year old freelance professional living in Orlando, Florida who holds a full-time job while freelancing on the side.
The question that follows next is… Where does Jason usually spend time on the web? Or rather where does he like to hang out?
- Is he searching for the latest freelancing opportunities on Google or Twitter?
- Is he a strong LinkedIn user or does he like to hang out in niche forums, Facebook groups or communities?
- Does he participate in discussions or leave comments on other freelancing sites or is he consuming content just for reading?
The ultimate goal and focus of your blog here is to produce real value for your Jason. It is to satisfy his needs or requirements.
Knowing your ideal reader and where they hang out can be super-helpful when creating this persona. If you’re not sure who to target, you can also have multiple ideal reader personas. Just see to it that they aren’t too narrow or broad.
3. Decide on the content pillars you’ll focus around
Knowing what to write about becomes easy when you have a few, relevant guiding topics on hand to target. People call them by different names. I call them content pillars because they actually form the real foundation for your blog.
Having some strong content pillars not only gives your blog focus, but also helps you develop a voice of your own. For example, if you’re starting a weight loss blog, your content pillars can be about:
- Weight loss tips, tricks and ideas
- Interviews and stories from people who’ve actually lost weight
- Your input/insight on crucial health related news
- The basics of eating and living healthy
- How burn belly fat easily
- Finding the right exercise routine
You can write multiple blog posts under each of the above pillars. And since they’re on the same topic, they connect together and ultimately prove/convince to your reader that you’re a thought leader in your niche.
4. Map out your content prior to blog launch
Having some targeted content ready to publish before your blog launch is always good. However, you’re free to go the other way with your new blog and have limited content. I’ve experimented both ways and it’s a personal preference.
But if you already have a social media audience and there are chances of your blog post going viral, it makes sense to be prepared to engage your new readers.
As Grace Moser of Chasing Foxes mentioned on my podcast with her: “I think it’s important to create a number of blog posts before you launch. We did 40 and put them all up on our site when we first launched. If you want to get lots of viewers right up front you need to create that content beforehand. People want instant gratification.”
Of course, you don’t have to have those many content pieces ready before you launch. Grace was able to do so because she was working full-time preparing for the big launch day.
Even if you have one post under all your important content pillars, it works fine. But you’re free to do more. Try to focus on quality and know that it’s okay (and often better) to have a small start, and consistent growth.
As you continue to blog more, you’ll start to learn more about your target audience and what kind of content they dig.
Last but not the least, make sure you’re having fun while blogging. This is easy if you select a niche that you already find interesting. People will see through your content and sense your excitement as you write content for them. If you seem uninterested, they’ll know.
This is how you create a blog that’s different and stands out from the rest.
The most effective content strategy and management tools for successful blogging
Developing a firm blog content strategy (and making sure you stick to it) can seem like a daunting task when you’re starting out.
However, there are many useful tools out there that can help you organize your content while staying motivated in your blogging journey. Here are some of my favorites:
- Trello (free)
- Google Docs (free) & Google Calendar (free)
- CoSchedule (paid)
- Airtable (free limited with paid upgrades)
Personally, I like to combine Google Docs with Trello to effectively manage all my blog content. I prefer Trello because it’s easy on the eyes, looks good and is simple to use. But for me, it’s Google Sheets where the real magic happens. I use it to track all of my promotion activities and SEO.
This is what my Trello board looks like:
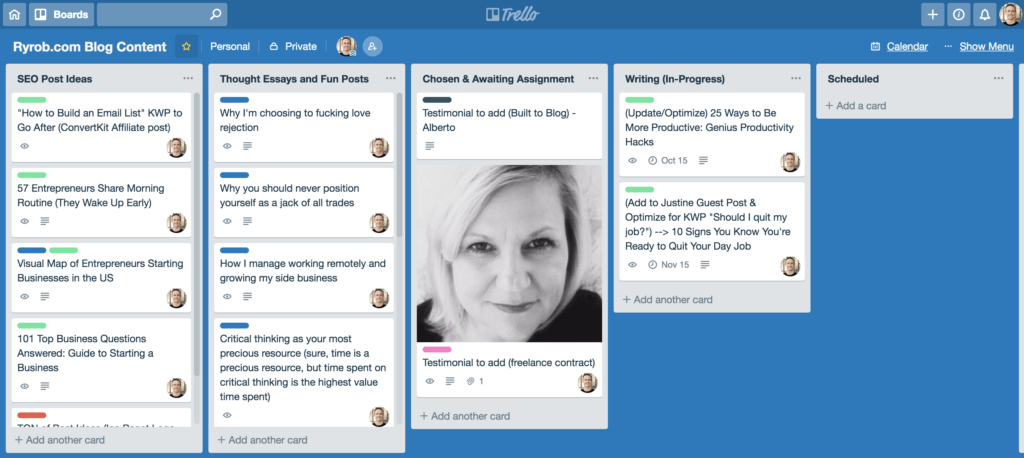
As you see, each of the columns on my board indicates what stage a post is in. Right from the ideas stage to published, Trello gives me a visual snapshot of what content is going to be published in the coming days.
When an article gets approved in my editorial process, it goes to my Editorial Calendar Google Sheet, like so:
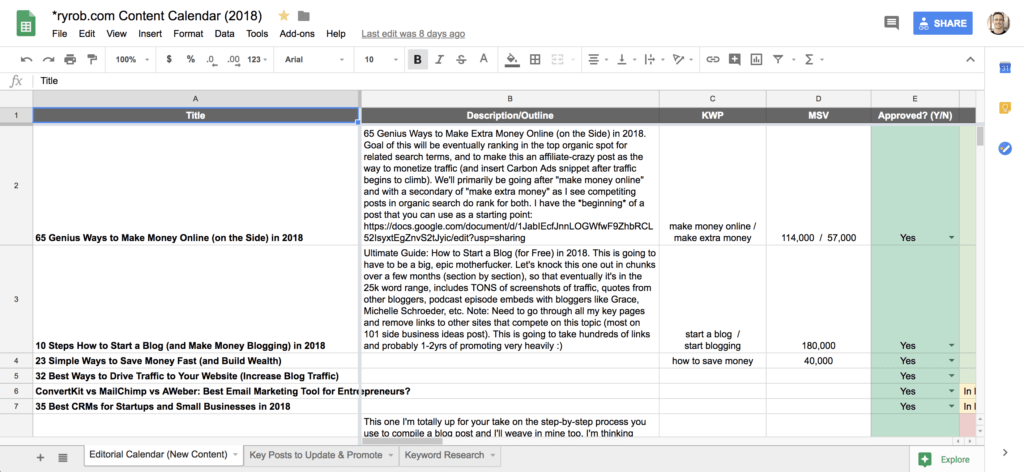
This is where I get into the nitty-gritty side of managing my content creation.
That even includes how I’ll be covering the subject at hand—and where I’ll dump the findings from my keyword research.
7. Commit to having a consistent blog publishing schedule

Want your readers to visit your blog again and again? Then give them a strong reason to come back.
In order to run a successful blog, it’s important to be consistent in your approach. Even research supports the fact that how often you show up matters.
When you focus on writing consistently on your blog, progress is bound to happen. Here are a couple reasons as to why you should focus on consistency at all costs:
- Set your reader expectations: When you are consistent with your publishing, it sends out a signal to your readers and gives them a fair idea on when they should come back for new content.
- Set your own expectations: When you commit to a set publishing schedule and stick to it no matter what, you know exactly when you will be publishing each time. This lets you prepare well in advance and set deadlines that push you towards taking action.
Besides this, consistently publishing content can help you run “content tests” and get a better understanding of what kind of content works best for your readers.
As Grace Moser of Chasing Foxes explained in her interview with me, they took their blog to millions of readers (growing monthly) by simply publishing a few blog posts week after week for several months. And that’s when they started to gain good traction. “Even if the majority of your posts don’t go viral, the more you publish, the better the odds that one will send a lot of traffic your way.”
Now, in the excitement to do more, don’t make the mistake of over-committing when setting your publishing schedule. Be practical and only commit to a realistic number of blog posts that you can publish per week. But once you do decide on it, stick to the schedule with all your might.
As prominent author/blogger James Clear said in an interview on my podcast, “Sacrifice the scope, not the schedule.” If you cannot whip up a 1000-word blog post on a weekly basis then cut it down count to 500. Do whatever it takes to stay consistent because it really matters a lot.
Your content calendar plays a really important role here. Spending a few hours mapping out your blog content can save you a ton of time and helps you stay prepared always. Now, whether you use Google Docs or a tool such as Trello for this purpose is up to you.
8. Use free photos and designs to make your blog content unique

Prior to publishing any new posts, there’s something that you should always do—add visuals.
Studies have shown time and again that blog content with images gets more attention: up to 94% more views.
They also get more social media shares: tweets with photos get 150% more retweets and Facebook posts with images get 2.3X more engagement.
Injecting visuals into your blog posts doesn’t take much time, but the returns are highly rewarding. In fact, celebrity chef Gaby Dalkin claims that her blog wouldn’t gain so much popularity if she hadn’t used high-quality images in her content. They proved to be the main ingredient for her success.
“It wasn’t until I hired two of my best friends—who happened to be a food photographer and food stylist—that my blog really took off. Because people eat with their eyes. And it allowed me to focus on what I love to do, which is developing recipes and engage with my readers.”
Of course, this doesn’t mean you have to go out there and actually hire a professional photographer for your new blog. It’s simply not feasible.
Instead, you can tap into the many online free photo/design resources to enhance your blog content. You don’t even need to have an eye for design to use good visuals. Sometimes even product screenshots (especially for tutorial and how-to type posts), can work wonders.
Free blog photo resources
One of the simplest and the most professional ways to sprinkle good design elements in your blog posts is to use images.
Gone are the days when “stock photography” was limited to cheesy photos with people awkwardly shaking hands and smiling in suits. Today, you’ll find many high quality websites that help you discover and use stunning photographs at no cost.
The following few fall under my favorites list:
1. Unsplash.
When it comes to finding free-to-use, natural and professional looking photographs for your blog, Unsplash is second to none. Every photo you find on here is carefully curated by a team of professionals. You’ll always find quality photographs here. Always.
What’s more, under the Unsplash license, you’re not required to attribute the original photographer, but of course it’s better if you do. This makes them an online resource that is the best for free blog photography.
2. Death to Stock.
If you have the money to spend on quality and exclusive visuals, then Death To Stock is what you need. Their online service works by sending you a hand-curated collection free and relevant images on a weekly basis. You can also choose to access 2,000+ professional photographs through their Premium section for $12/month. Either way, it’s a great way to find the right photos for your blog.
3. Pixabay.
If you’re a blogger who wants a large variety of visuals to choose from, then Pixabay gives you access to a free-to-use collection of 1.4 million videos, photos, illustrations and vector graphics. However, since most of these are taken from other free stock photo sites, the quality isn’t that great. But nevertheless, it’s still a viable option if you have enough time on hand to search.
Other worthy free to use blog photo resources for you to check out:
- Wikimedia Commons: 21+ million photos/images available via public domain and completely free to download.
- Life of Pix: Quality photos donated by an ad agency based in Montreal, Canada that bloggers can use for free.
Free and easy-to-use blog design resources
When it comes to making your blog posts visually appealing, you’re not limited to stock photos. There are many awesome design resources that can help you make your posts more attractive. The best part is you don’t need to have any design knowledge to use them. These are some of my favorites:
1. Canva for social media quotes and images.
Designing/creating graphics used to be incredibly difficult for the creatively challenged until Canva came along and changed everything. This free design tool is just a few years old but has turned out to be one of the most versatile resources for non-designers. Its drag and drop feature and a variety of templates can help you design any element for your blog. Right from featured images to social media posts to custom quotes.
The basic version of the service is free and should be enough for you to get creative.
2. Visme for creating presentations and infographics.
Just like Canva, Visme is a free-to-use design tool that you can use and access from anywhere. Using it, you can create stunning custom designs for your blog posts. It gives you access to hundreds of unique templates to create attractive graphics, infographics, quotes, social posts and the like.
3. Noun Project for design icons.
![]()
If you like to get on the creative side of things and don’t mind rolling your sleeves up, then you should check out Noun Project: a site that gives you access to the largest variety of icons to work with. With more than 1 million+ royalty-free icons available, it’s where bloggers usually go for quality icons.
Other great design resources for how to start a blog that looks great:
- Subtle Patterns: Includes basic blog backgrounds/patterns created by freelancer marketplace TopTal.
- PicMonkey: An online photo editor with a useful smartphone app to edit your photos.
- Pixlr: A more advanced and robust online photo editing tool for those who are comfortable using Photoshop.
Final takeaways: How to start a blog (and make money) this year
With this, we come to the conclusion of my ultimate guide on how to start a blog this year.
I hope you’re excited about your new blog—and all the possibilities for success with it over the coming days, weeks and months!
Remember above all else, that people won’t consume your content if you don’t give them a compelling reason to.
Now as a blogger, your aim should be to consistently produce exciting (and relevant) content that not only helps you connect with readers—but also with other bloggers in your niche. Other bloggers who are happy to share your work with their own readers. It’s through building community and providing value that you’ll find success.
When you learn how to start a blog (the right way) and create great content, monetization becomes a whole lot easier.
I know we covered a lot of ground here, but this guide is the culmination of what I’ve learned as a blogger over the past decade.
I created this guide about how to start a blog because getting my own blogs off the ground have been a life-changing experience that’s made me a better person. And I want you to experience that same growth.
By now, you should have confidence to get over your blogging fears, embrace your creativity and start a blog that’ll one day (soon) become successful.